How to Write A Manual That Your Users Will Love to Use
2023-12-7 User Manuals
Do you want to know how to write a manual that is easy to use for everyone? In this article, I am going to show you how we create user-friendly, appealing AND legally compliant user manuals for our clients. After reading this you might be able to write great instruction manuals yourself, without getting a degree in technical communication, design AND law. It’s a lot quicker than the usual way!
Just follow the steps of the INSTRKTIV-5-STEP-USER-MANUALTM PROCESS.
Or, as we call it internally, the I LUV MANUALS TECHNIQUETM (L=Liability, U=USABILITY and V=Visibility).
Knowing how to use a product safely, effectively and efficiently is key to a successful customer experience. By providing your end-users with professional instructions, you will have happier customers, increase your liability and decrease customer support costs.
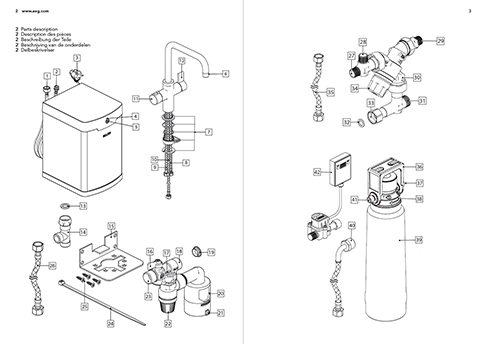
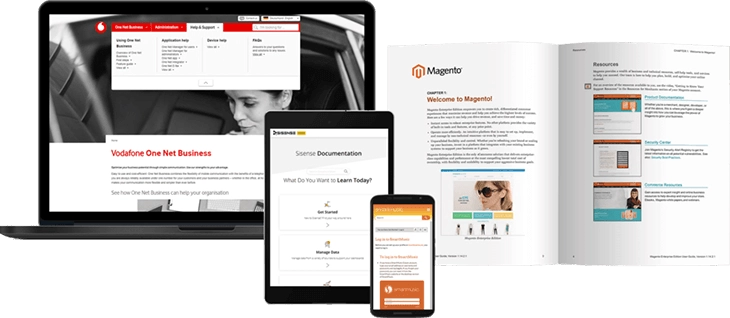
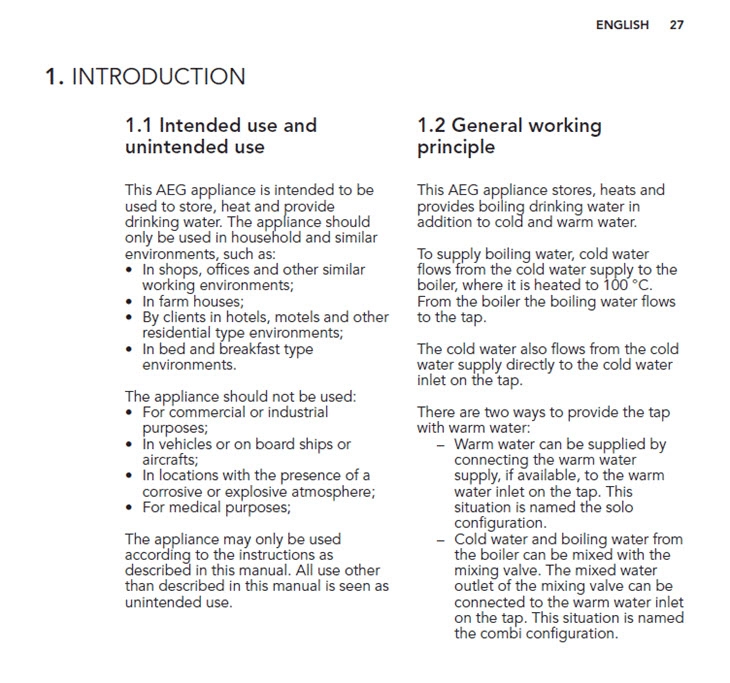
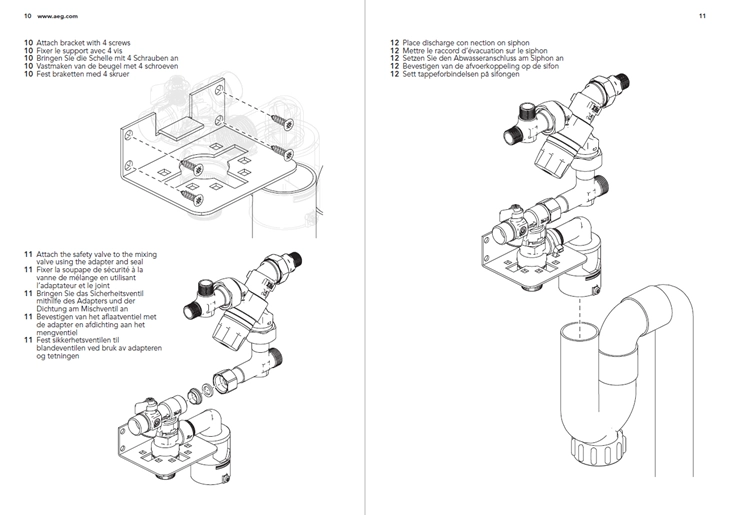
Do you want to know how to write a manual that impresses everyone, like this example that we created for AEG/Electrolux?
.webp)
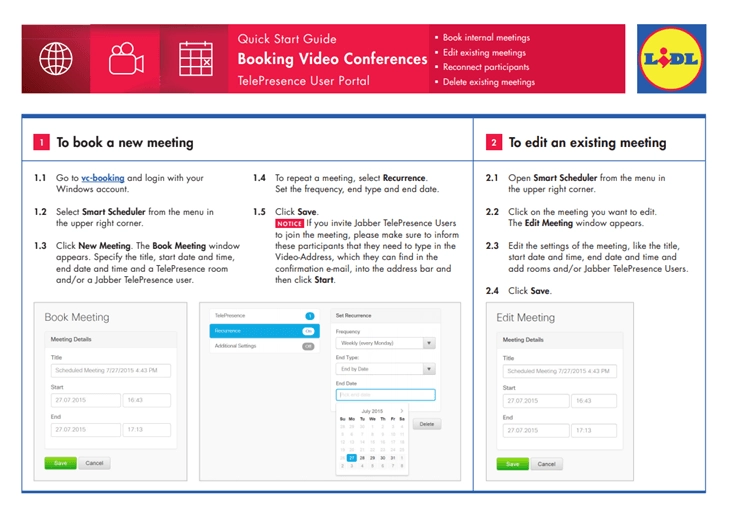
Or how to write a user manual like this quick start guide for LIDL?
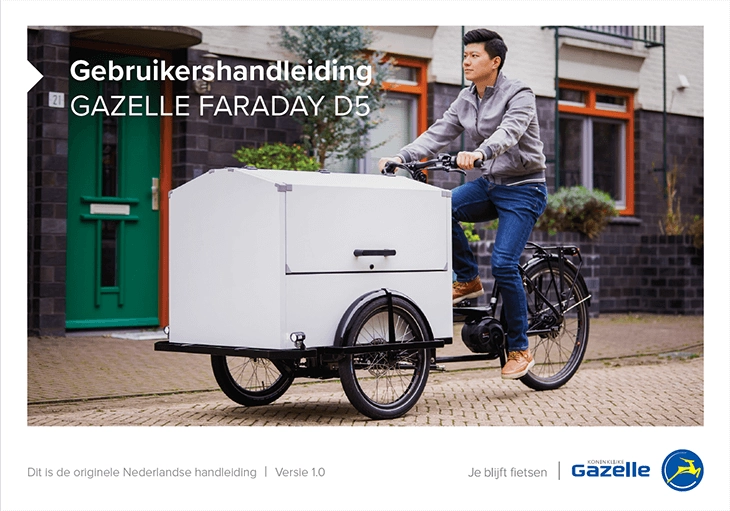
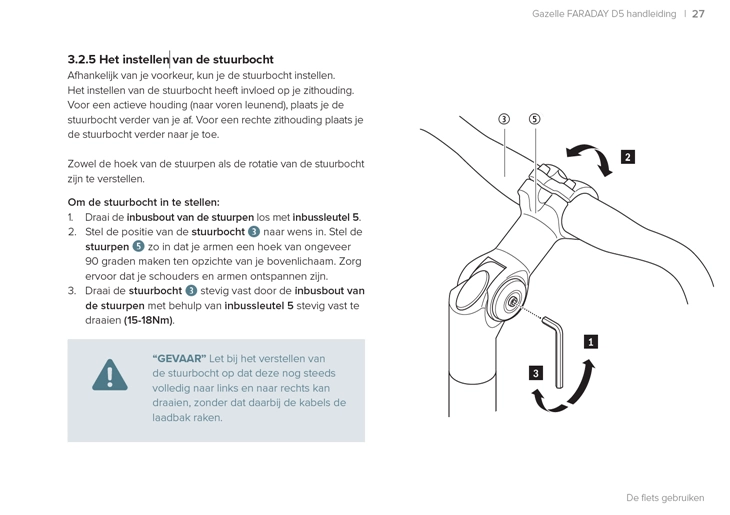
Like this user manual for Gazelle?
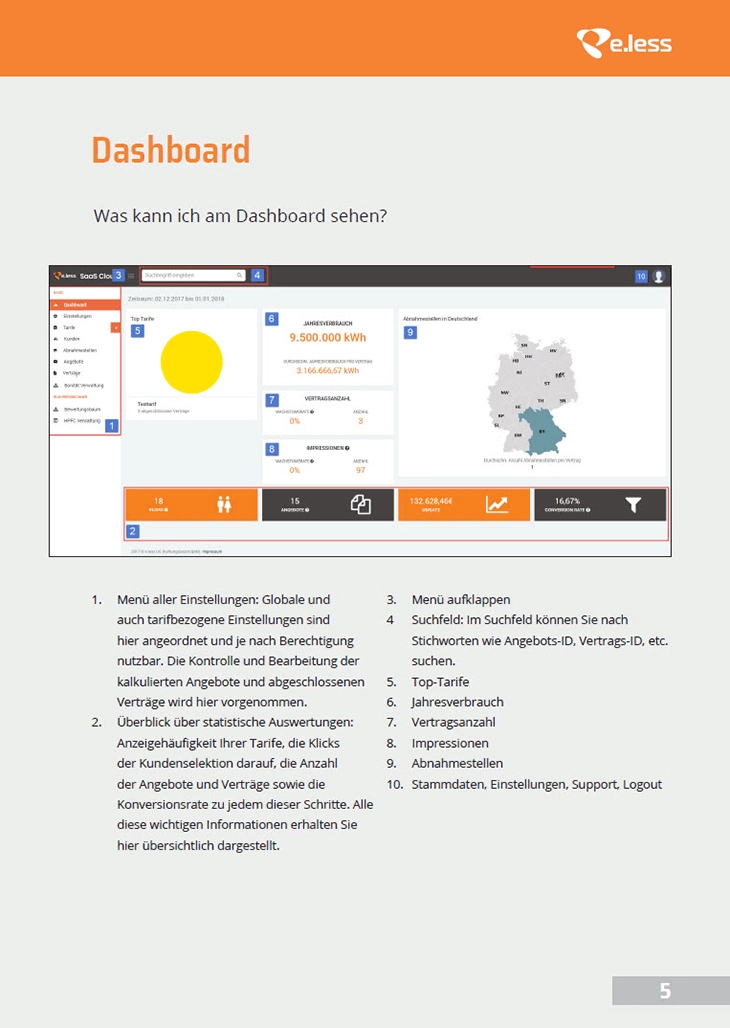
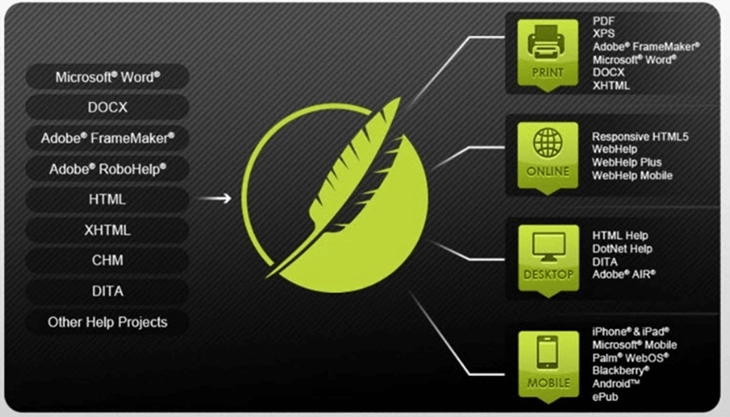
Like these user guides and online help?
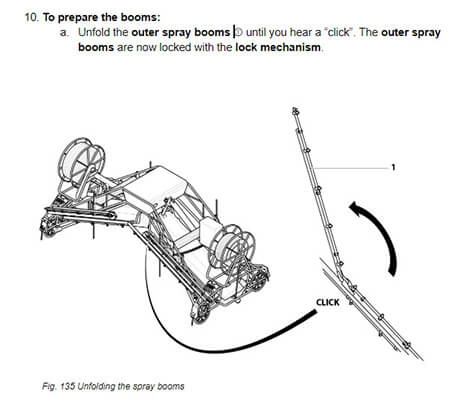
Or how to make a manual like one of these examples?
And finally, how to create an instruction manual, like this one:
Then read on and download our free user manual template so you can create your manual on the go.
![]()
Table of Contents
CHAPTER 1 - How to Write an Instruction Manual In Which Your Users Find What They Are Looking For
CHAPTER 2 - How to Write an Instruction Manual that is Clear and Ensures Safe Use of Products
CHAPTER 3 - How to Create a User Manual with Clear Visuals
CHAPTER 4 - How to Present Your Instruction Manual
CHAPTER 5 - How to Finalise and Distribute Your User Manual
DO YOU WANT A USER MANUAL TEMPLATE THAT ALREADY CONTAINS THE LEGAL PARTS?
Take the shortest way to a compliant manual. We have developed user manual templates for machinery, toys, medical devices and electronics that contain all legal content.
How We Use the ‘I LUV Manuals Technique’ to Increase Customer Satisfaction By 63% and More
Does one of the following apply to you:
- You need a user manual for your product,... NOW!
- Your customer support is overloaded;
- Your users are unsatisfied;
- Your product did not pass certification tests because the instruction manual does not comply;
- You worry about your liability because the user user guide does not comply and/or does not cover all safety warnings;
- You want a good looking user manual that contributes to a better use experience;
- You are spending too much time on creating your user manuals and wonder if you can work more efficiently. After all, most of your instruction manuals are X% identical anyway.
By using the I LUV Manuals technique, we are able to:
- Increase customer satisfaction by 63%
- Decrease calls, emails and chat conversations by an incredible 71%
- Reduce Liability by 98%
- Ensure passing any compliance tests
- Ensure passing customs regulations
Let’s dive into it.
Watch this video to see if you can publish your user manual online.
CHAPTER 1 - How to Write an Instruction Manual In Which Your Users Find What They Are Looking For
In order to have your users find what they are looking for, a well-structured manual is an important element.
Information without structure is not very useful. You have to identify what is important and what information is trivial.
When you organise the content offered to your users properly, it will save them time and effort in learning and solving the problem for which they are trying to find a solution.
When information is not organised properly, your user will quickly give up. And maybe worse, they will have a negative experience with your brand. You might wonder: “How do you structure a manual?”
Serve information needs by gaining knowledge about your user
The first thing you may want to do on your way to provide users with the right content is to get to know both the subject and user better.
Do not assume the user has prior experience or product knowledge before you have defined who your user actually is.
Ask yourself questions like:
- What describes the user? What is their age, gender etc.?
- What tasks do they need to perform?
- Why is the task being carried out?
- How frequently will it be carried out?
- In what environment will the product be used?
- What language do they speak?
- Is the user under stress?
- What is their background?
- Is the product used professionally, commercially or privately?
- What technical experiences, qualifications, education, training, knowledge or skills do they have? (for example: when you write information about a software update, your user most likely has prior experience with the software);
- If applicable, are any tools available?
- Does the user have access to the internet?
Why is this important? Let’s have a look at this example:
Dutch Rail (NS) were at a point where they considered converting all their existing paper user manuals available about their trains to online documentation and videos.
Playing a video usually requires high speed internet. Although reception is quite good in the Netherlands, high speed internet is not always assured when crossing the Dutch countryside.
Also, when a train would have a breakdown in a tunnel, chances are big there is no internet and thus no access to information at all.
This made them decide to make all information available electronically, but in an offline format.

By asking the correct questions that help you to identify who the reader is and where and how information will be consumed, you will be able to better serve their information needs.
Also, do not forget to consider the needs of disabled users. There might be users with low vision or who are colour-blind. You may want to serve them with alternative instruction manuals in Braille, large print or audio.
Create a Persona to Help you Understand Your User Better
As I am a big fan of visualising things, I encourage people to create personas.
A persona is a visually presented user profile in which some reasonable assumptions are made about the characteristics of your users.
I learned about creating personas during my Master Industrial Design Engineering course. So, creating personas is not only useful when developing your user guides, but also at the start of the development of any product or software.
To create a persona:
- Ask yourself the correct questions to identify and get to know the user.
- Find images online or in magazines that represent the user, their hobbies, the environment, their skills etc.
- Use a photo editing tool or old-school scissors and paper to create a collage representing your user.
- Write an introduction in your user manual that describes the user. For example:
These instructions are intended for the end-user of the [machinery name]. The end-user can be described as each person who interacts directly with the machinery. The end-user typically includes, but is not limited to:
- An Installer
- Maintenance personnel or technicians
- An Operator
- Dismantling personnel
All use of the machinery shall only be carried out by an authorized, properly qualified and skilled person of 18 years or older, who:
- Has read and understood this instruction manual
- Is familiar with operating similar equipment
- Knows how to control this machinery
- Is aware of all possible dangers and acts accordingly
- Is trained and authorized to work at heights
- Has a spraying license, if applicable
The required maintenance and/or inspection work as stated in this user guide is allowed by the aforementioned persons, unless clearly indicated when this is not allowed.
Exceptions to this are the supplied lifting and climbing materials and personal protective equipment. These shall always be inspected and certified by approved companies/ authorities.
The purpose of this document is to make the end-user familiar with the installation, use and maintenance of the machinery.

Persona of the user for the IsoVox recording studio
Gaining knowledge about your users helps you to focus on what is important to them. This helps to prevent wasting the user’s time and your own time by explaining things that the reader already knows or are irrelevant.
A commonly seen mistake is that user manuals often include marketing or sales information. This distracts the user from finding the information they actually need.
Users usually consult the instruction manual because they want to get something done or solve a problem they are facing: They want to install the latest version of their anti-virus software, bake bread or find the meaning of the flashing warning light on top of their machinery.
Knowing your user helps you to write more consistently. It helps you select the correct information and to focus on the tasks that your user wants to complete.
Have technical knowledge, but not too much
This may seem like common sense, but knowledge really is the key to writing instructions that really help your users.
For example, when writing the user instructions for a camera, knowing how the shutter speed and aperture interact with each other, makes it much easier for you to describe each function as it relates to the whole.
In many companies, the user manuals are written by someone from marketing or R&D.
I don’t want to stereotype, but marketing people may not always have the technical knowledge to explain things correctly.
On the other hand, their more tech-savvy colleagues from R&D often use the user guide as a medium to show off to the outside world how advanced their invention is by drowning it with incomprehensible and irrelevant terminology, formulas or process descriptions.
So, technical people may not always be the right persons to engage customers.
Both too little and too much technical knowledge can have their disadvantages.
It is the task of the technical communicator to share technical information clearly with the user of a product.
Technical education, background, experience and communication skills will help each technical communicator do this successfully.
Download our free user manual template so you can create your manual on the go:
![]()
Gain product knowledge by trying the product and studying available information
When writing software manuals, product manuals or any other manual, you must have 100% understanding of the product you are writing for.
The best way to do this is by using the product yourself: try to install it, push the buttons, open lids, identify signals etc. WARNING! Always take your own safety into account!
Possibly there is already some information available, such as existing instruction manuals, a risk analysis or marketing information. Study this information and go through the full product life cycle, from purchasing to disposal, in your head.
Useful questions are:
- What is the intended use?
- What are the names of the most important parts?
- How is the product delivered to the end-user?
- How do I transport and store the product?
- How do I install/mount the product?
- How do I commission the product/make it ready for use?
- How do I use the product?
- How do I change the settings?
- How do I maintain the product?
- How do I repair the product?
- What are the possible errors and how do I solve them?
- How do I dismantle and dispose of the product?
- Are there any spare parts available?
- What are the technical specifications?
- What risks do I encounter during the stages of the product life cycle?
A hands-on approach (trying the product yourself), will give you a feel for what sort of information needs to be communicated to the user.
When things are unclear, look for information on the internet or in existing, similar user manuals. Other product manuals can show you how other technical writers have found solutions for similar problems. But be careful…
Always trust yourself and don’t fully rely on what others do. Be critical and only consider information that you fully understand and can validate.
Also, existing material might not always be as clear. Often you find a lack of structure, inconsistency or vague instructions. We will discuss that later.
When studying existing material, you will most likely find similarities and differences.
Your product may or may not include all the functions that you find in existing material. Identify the differences. What makes your product unique? What functions are identical? What information can you use for a better understanding of your own product?
When you slowly build up a complete picture of your own product, questions will arise. Not everything will be clear after your research. Make sure to note down any unclarities. These will be solved in the next stage.
Talk to experts for 100% understanding
The best way to have your questions answered is by talking to knowledgeable people that know the product best.
Mostly, these people are the ones that took part in the development of the product, or are experts that are involved in other stages of the product’s life cycle. We call them subject-matter experts (SMEs).
So what exactly is a subject-matter expert?
An SME is a person with a deep understanding of a particular domain (which can be a job or topic). SMEs can be mechanical, industrial design, software or electrical engineers. They can be helpdesk support staff, maintenance personnel or installers.
But also managers, scientific researchers, testers, dealers or business owners might have the in-depth knowledge of the subject that you are writing about and be the subject-matter expert you are looking for.
Some tips when interviewing your SMEs:
Make sure to do your homework well. Study your topic thoroughly and prepare a list of clear questions.
Gather all your questions together and make an appointment. As SMEs are valuable to a company because of their knowledge. They are also busy people. Take this into account when you are interviewing them. Don’t waste their time.
Most technical SMEs are more comfortable in the world of numbers, processes and technical principles than words. They are more into getting things done and getting results than communicating about how to get these things done. They might use a lot of jargon. All those numbers, technical terms etc. are not always necessary to write clear information. Do not force your SME to avoid jargon. It is your job as a technical communicator to ask the right questions about the meaning of terms and to decide what information to use. Make sure that they feel comfortable and appreciated for their knowledge and valuable information.
Make sure that the answers to your questions cannot be found in existing material, to prevent losing your credibility in the eyes of a sharp engineer.
The best way of interviewing an SME is in person. Alternatively, you can do it with a phone call. Sometimes you will be asked to put your questions into an email or spread sheet. My experience is that this will delay a project: Answers to questions will lead to new questions. It is your task to keep on asking questions until you understand every bit.
Make sure to record your interview. I always use my mobile phone to make videos of all my interviews and when we discuss the full functioning of a product. This will prevent you from asking questions during a second interview or writing down nonsense in the eyes of your SME.
For example: during an interview, SMEs will automatically mention the right names for product elements. A display might be called an ‘operation panel’ and not an ‘operation screen’. You might not remember all of this, but when looking back at your material, you can get out all of this information. This prevents a lot of frustration. When you do your interview online via teleconferencing and/or a screen sharing session, make sure to make a screen casting.
Also, ask SMEs to review your work. Their knowledge and feedback is of vital importance for writing clear information for use.
Solve your user’s problems
One thing that I would like to emphasise a bit more, is the importance of solving your user’s problems. This is the starting point for both interviewing the SMEs and the mapping, structuring and organising your information (see next sections).
The user(s) you are writing for might encounter problems during the life cycle of the product. They want to solve these problems. And that's where they need you for.
So when talking to SMEs, gathering information, etc., always try to identify the problems that they might face.
Typical problems are similar to the above described questions and have to do with the installation, use, maintenance, repair, cleaning and disposal of the product.
Problems are very specific, such as:
- How do I attach the feet to my microwave?
- How do I replace the mould of my machinery?
- What does the red flashing LED light mean?
- Am I allowed to clean the housing of my product with a detergent?
Sometimes a user’s problem is too complex and a reader might have a hard time to assimilate the information. In that case you can break it down into chunks.
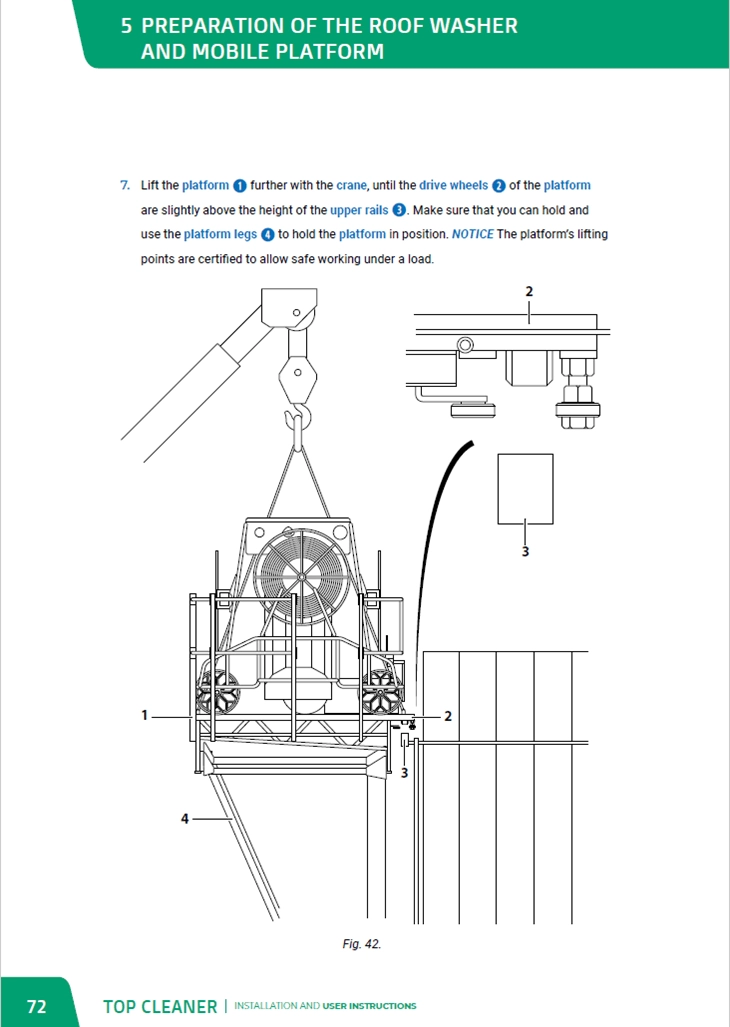
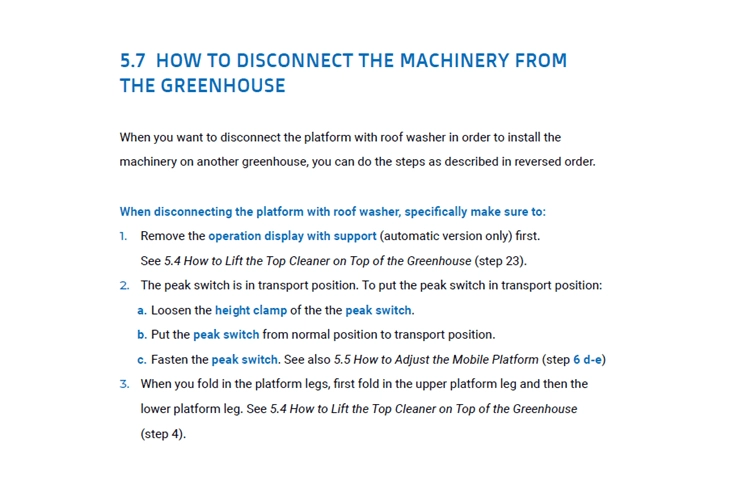
For example, for a type of machinery, called the Roof Washer, we created an instruction manual. One of the main steps that needs to be taken by the user is making the Roof Washer ready for use.
So the main problem would be: How do I make the Roof Washer ready for use?
As this is a HUGE topic, we have broken it down into the following chunks:
- How to Check the Contents of the Delivery
- How to Prepare the Mobile Platform
- How to Prepare the Roof Washer
- How to Lift the Top Cleaner on Top of the Greenhouse
- How to Adjust the Mobile Platform
- How to Adjust the Roof Washer
- Adjustment of the main brushes
- Adjustment of the optional window protection switch
- Adjustment of the optional gutter brush
- Adjustment of the front wheel switch levers
You are already starting to create topics now. Topic-based authoring is essential for writing clear instructions.
The table of contents gives an overview of the user’s problems
Download our free user manual template so you can create your manual on the go:
![]()
Mapping, structuring and organising your information
You are overwhelming yourself with information: from using the product and analysing all available documentation, to the information you get from the experts.
This information consists of a description of the problems your users would like to solve, to solutions on how to solve them, but also all kinds of other information such as electrical schemes, spare part lists etc.
One of the most challenging tasks of a technical writer is to gather all the information, analyse it, determine what is relevant, delete information, organise and structure it.
How do you process and organise all this?
This is fairly impossible without mapping out your information. Again, your goal should be to keep all information that is useful to write topics that answer your user’s questions.
These topics will be clearly organised and identifiable in your table of contents or menu structure, following the life cycle of your product (see next section).
But before you will have your final, well crafted (yes, this should be your masterpiece) table of contents, you would like to structure and organise all information.
A few methods and tools that can help you:
- Create the table of contents on the go;
- Use mind mapping;
- Use information mapping techniques;
- Use old-school post-its.
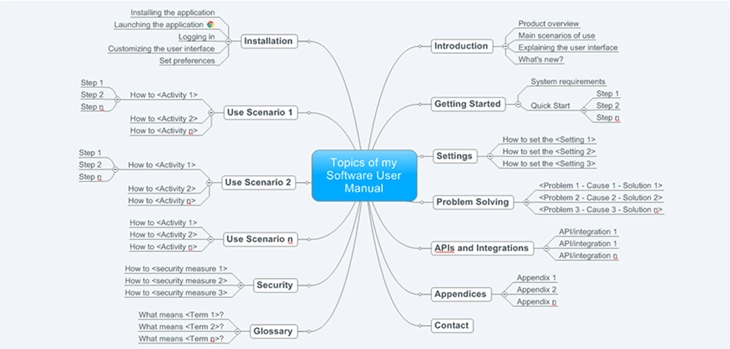
Example of a mindmap
All methods are based on the following principles:
- Break up all relevant information into small and manageable chunks;
- Each information chunk should be limited to a single topic;
- Label each information chunk in such a way that it identifies its contents, meaning that the description that you come up with should describe the content. For example, it would be better to label ‘How to Update the Software’ with Installation and not with Use.
- Organise and structure information, while making sure you are consistent in organising, formatting and sequencing information (and be consistent in the use of terminology).
Again, you are automatically further defining your topics here.
One single topic gives the answer to a single question a user has. Users want to solve one problem at a time, not multiple. That confuses them.
When your user has solved one problem, he/she will proceed to the next topic, and solve the next problem.
Each topic will have a place in the user manual. A topic can become a chapter or a (sub-)paragraph. Or maybe a topic fits better in another guide that needs to be created. Let’s put this into perspective.
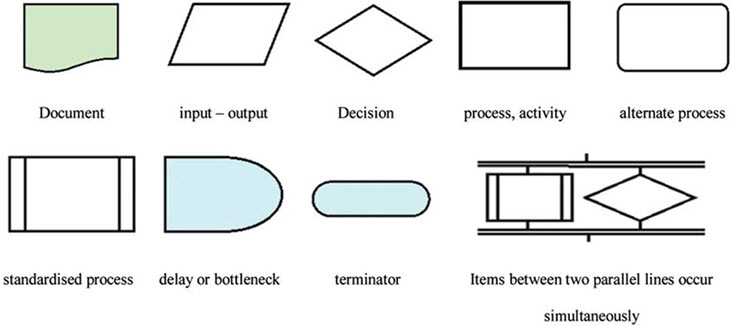
The 82079-1:2019 standard for the preparation of Information for Use, structures information around information types and information products.
Another way of visualising the relationship between information types, such as topics and instructions, is by means of the following model:
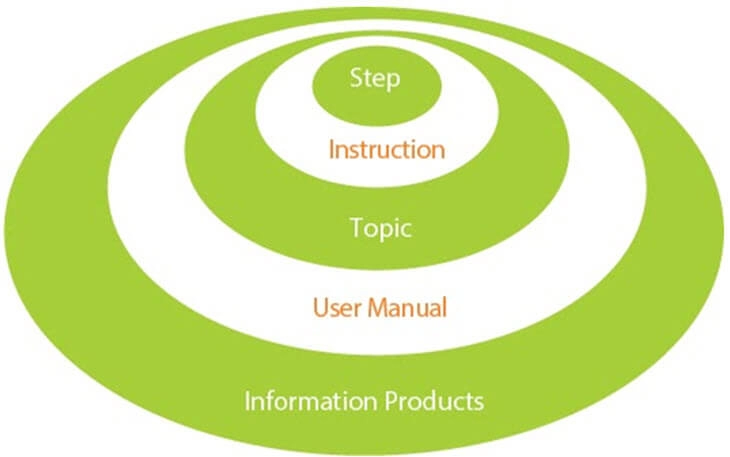
Besides the position of ‘topic’ in the bigger picture, this model shows how to break down a topic into a procedure.
Let’s have a closer look at what a structured step-by-step procedure looks like.
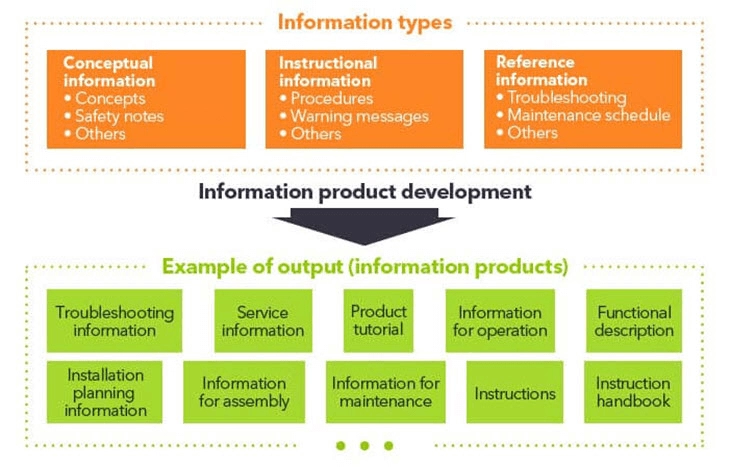
Information Products
All ‘information for use’ is basically comprised of information based on three types:
- Instructional information
- Conceptual information
- Reference information.
The information can be structured around several information products that are selected, presented, and delivered in different media to meet the needs of different target audiences.
User Manual
A user manual or instruction manual is one type of information product. Other types are installation manuals, maintenance manuals, online help etc.
A user manual, when printed, is an entire paper booklet describing how to use a certain product. It contains all topics, instructions and steps that are necessary to solve a user’s problems.
.webp)
.webp)
The user manual, installation manual and quick start guide of a product
Topic
User manuals are structured around topics. Each topic solves a user’s question.
A topic can be conceptual (e.g. a description of how a process works), referential (such as a maintenance schedule) or instructional (e.g. procedures and safety instructions).
Examples of instructional topics are “how to get started”, “how to replace the battery” or “how to make pancakes”.
Topics need to be grouped logically.
Download our free user manual template so you can create your manual on the go:
![]()
Instructions
If a topic is complex, it may contain several chunks, indicated as instructions in the above information type model. Instructions are basically subtopics.
The above described topic that describes the preparation and adjustment of a machine, is divided into chunks of (sub) instructions such as “How to adjust the main brushes” and “How to adjust the optional window protection switch”.
Steps
A step is a detailed description within an instruction. Instructions contain several steps. Together they describe the step-by-step process of performing a given task.
Each instruction has a clear goal, which should always be task-oriented and to the point (principles of minimalism).
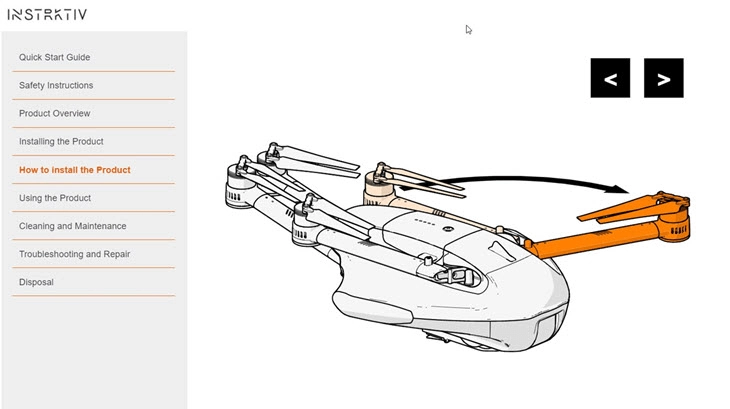
Let’s have a look at the following example.
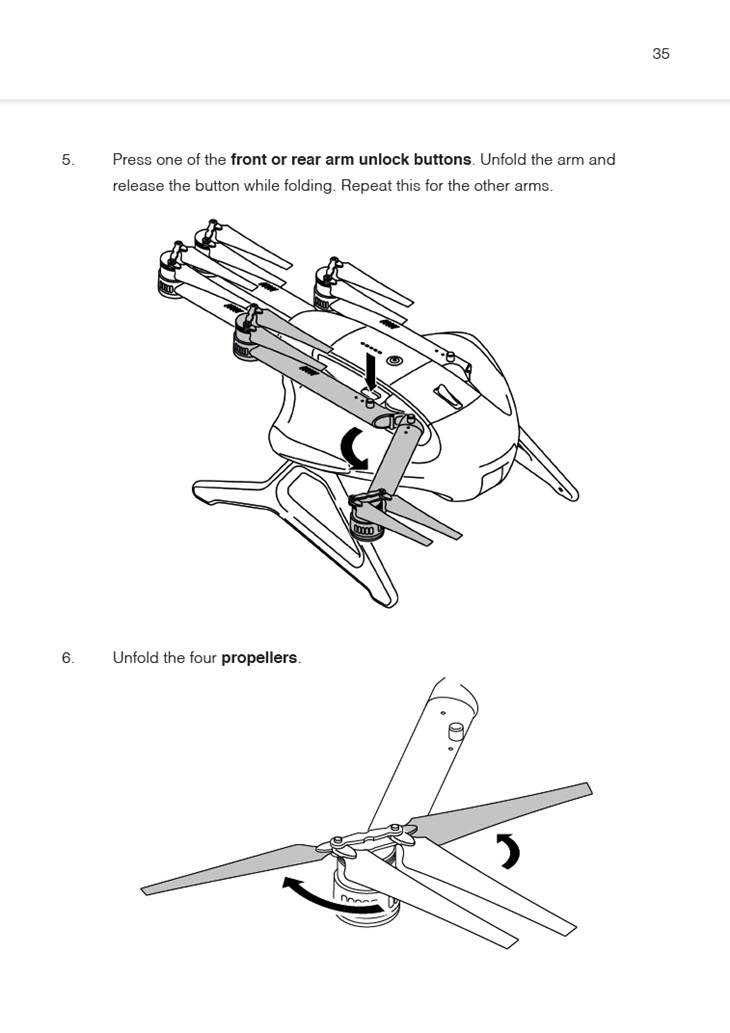
The page of this “drone instruction manual” contains two steps. These are two out of six steps within the instruction/subtopic How to install the drone. Each step is task-oriented and enhanced with illustrations.
Illustrations contribute to a better understanding of what needs to be done.
The user follows these steps by reading through the instructions. You will find more about how to write instructions in the next chapter.
Try not to use more than 10-12 steps when you want your instructions to be effective. Use 5-7 steps when you want users to memorise a task. This is the magical number of objects an average human can hold in short-term memory (Miller, 1956)
If necessary, a step can be enhanced with embedded safety warnings, tips with a more detailed description on how to perform the step or error recognition in case a step is done wrongly.
It is of crucial importance to format and present information types such as warnings, steps, error recognition, tips, consistently at all times.
Consistent formatting will support users identifying the information they are looking for. For example, clear formatting of a safety warning draws more attention to the safety message as the user visually recognises it as being a safety message.
![]()
Let’s recap.
We have discussed several methods and models that will help you map out, structure and organise information.
There is not one single way that works best, but I think a combination of the above mentioned techniques, with some good theoretical background, is the way to write clear user guides.
One last thing I would like to discuss is the similarity that I found between the information development process and the product development process.
The process of gathering and structuring information is quite similar to this model that I was taught at university, which is used for innovation processes.
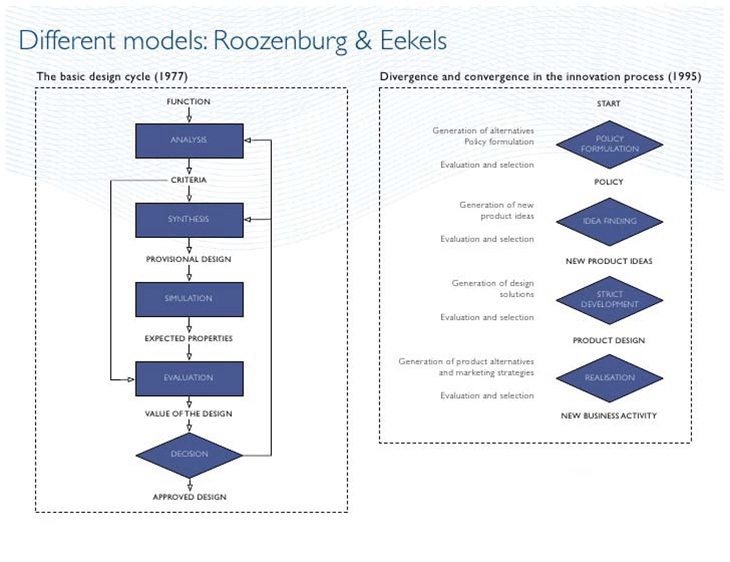
At the left, the model describes the basic design cycle. It starts with a description of the function that a product or service needs to fulfill.
After a broad analysis of strengths, opportunities, weaknesses and threats, you are able to draw up your criteria (list of requirements). Through a process of synthesis, simulation/prototyping, evaluation and technical elaboration you will finally have a design that is ready for mass production.
The right model describes the process of researching, idea generation, concept creation and realisation. Each of these stages are characterised by a process of divergence and convergence. You first gather many alternatives before selecting the best ones.
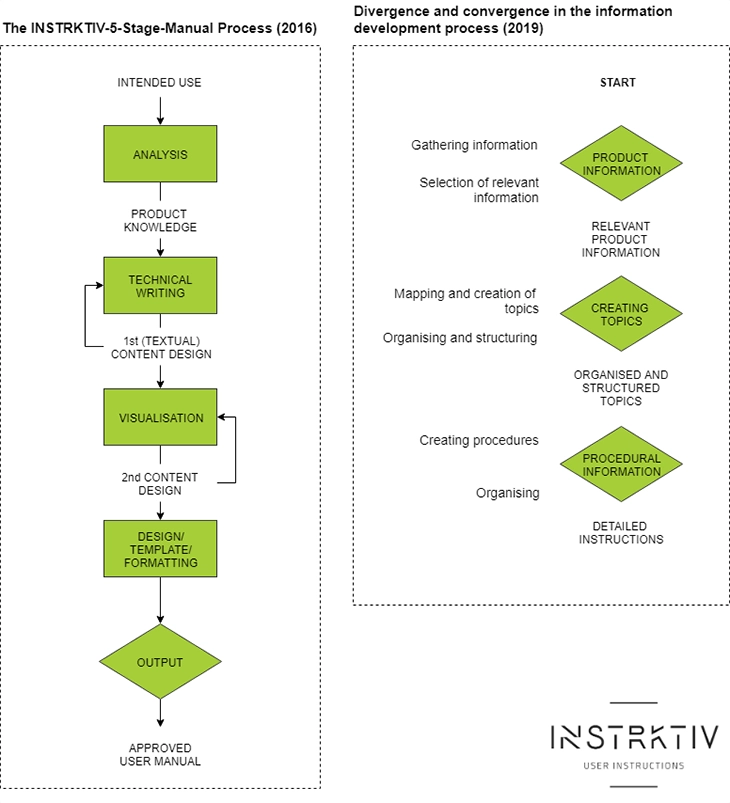
When I apply this model to the process of creating user instructions, it would look like the following:
Organise your topics for the sake of easy navigation
I would like to talk a bit more about the importance of your table of contents and thus the way you organise your topics in the instruction manual
The table of contents (ToC) should be incredibly carefully crafted. It should be a well thought-over piece of art. The ToC is the spine of your user manual!
Why does the ToC play such an important role?
When your users are facing a problem and they want to consult the user guide to find an answer, they will most likely go to the table of contents to see where they can find that answer.
A clear table of contents helps the user to navigate to the right instructions, without having to frantically search through the entire instruction manual.
I prefer to organise topics in the ToC based on my audience's needs and the purpose of the information, following the life cycle of the product.
Mostly I start with a default table of contents. When gathering information, as described in the previous sections, I write down the names of my topics on post-its, label them and put them on my wall or I create a mind map online.
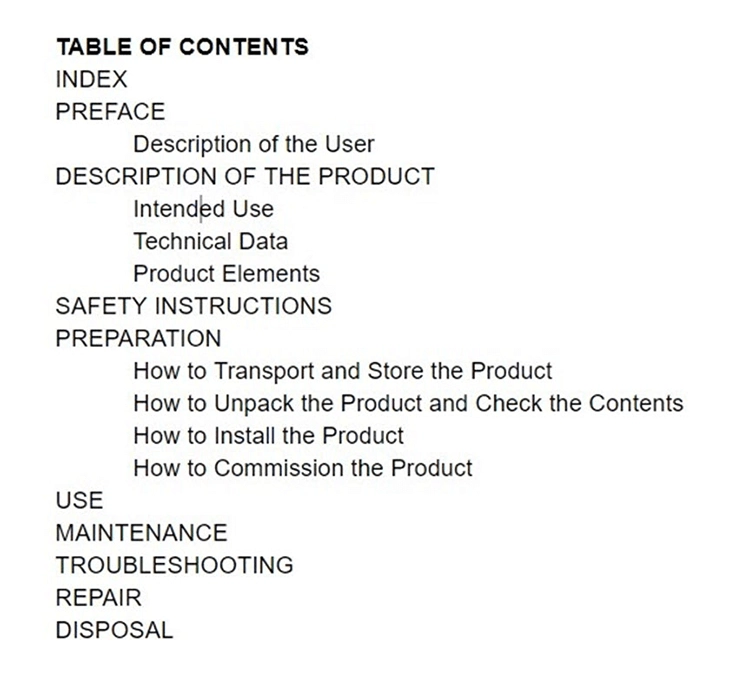
Example of a default table of contents
When I think all is completed, I add my product specific topics to the default ToC, organise them and finalise my table of contents. Mostly, we discuss the ToC with the company that hired us.
Another important thing to take care of and which is essential to help your users finding solutions through the ToC, is to craft the name of your headings really well. We will discuss that later in more detail.
As some last notes, I want to mention that the sections about mapping, organising and structuring information are quite theoretical, but being skilled in this is one of the most essential skills of a good technical writer.
The only way to check if you have done it right, is by checking if your users can quickly find the information they are looking for. If not, then you probably didn’t do something right in the mapping and organizing process.
CHAPTER 2 - How to Write an Instruction Manual that is Clear and Ensures Safe Use of Products
Once we have determined our topics and structured them to form the table of contents (or menu structure for online help), we can start with the actual writing of the content.
The main goal should always be to write a user manual to make safe, efficient and effective use of a product possible.
Let’s break this down.
Download our free user manual template so you can create your manual on the go:
![]()
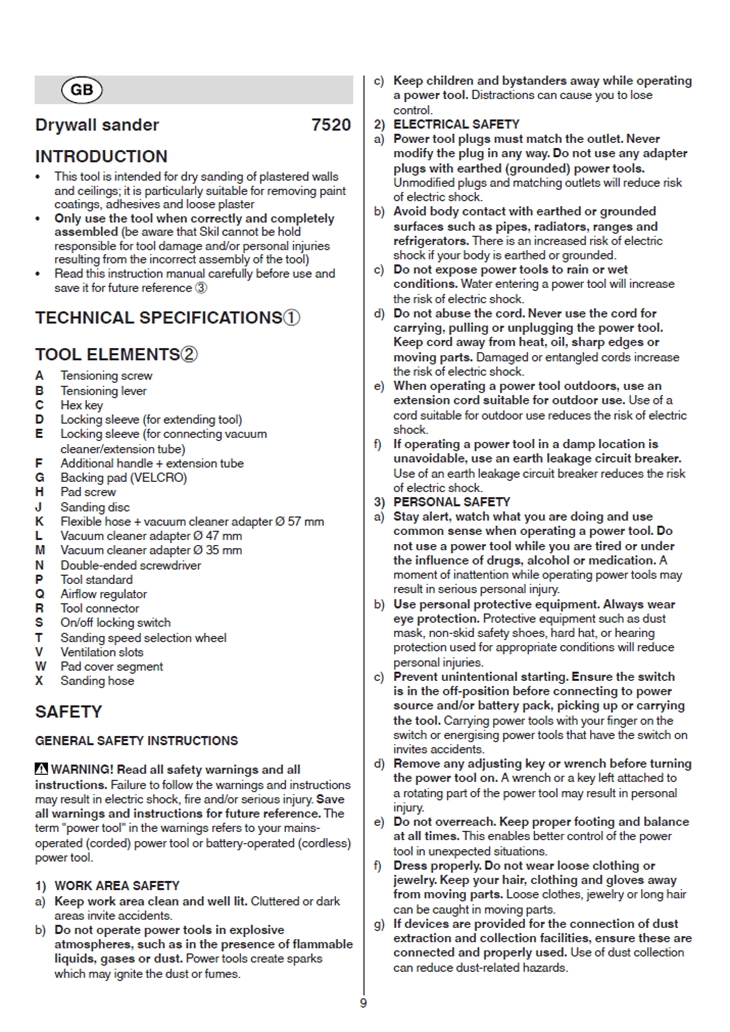
Engage your audience by avoiding jargon in your instruction manual
Instruction manuals written by technical people tend to contain huge amounts of jargon.
What is jargon?
Jargon is unnecessarily complicated language that is mostly used to impress instead of inform your audience.
I am not saying that you should not use any technical terms. Often you need them to explain a product well.
The starting point should be to create instructions that are as clear as possible. Using terminology that is not part of the usual vocabulary of your reader does not contribute to that.
Let’s have a look at this example:
You can perfectly say “Tighten the lower proximity switch securely”. Using ‘lower proximity switch’ is just a necessary use of a technical term.
However, when you say “Apply sufficient torque to the lower proximity switch to ensure that the proximity switch assembly is securely attached to the ramp and such that loosening cannot occur under extreme weather conditions”, you are using too much jargon.
Often, specific terms are useful and may even be the only known terminology within a particular audience. In those cases, using them is the clearest way to communicate with your target group.
However, if your readers are specialists, going beyond the use of the necessary technical terms may cause misunderstanding and will alienate your reader.
One of the most heard about complaints about user instructions is when there is too much use of jargon. The writer of a user guide often does not realise that the reader does not have the same background or knowledge about a product.
Again, that’s why knowing your audience is crucial.
When you can’t find another way to explain a concept except by using jargon, make sure you explain the meaning of the terminology (including used abbreviations) in a glossary.
Remember that you are writing to communicate the use of a technical product, not to impress. If you realise that, you will automatically use less jargon.
Help your user to find what they are looking for by meaningful headings
A heading is a title at the head of a page or section of a book.
The description of your topic is a heading and will get an entry in the table of contents (ToC). The ToC is consulted by the readers, to get as quickly as possible to the topic that contains the information they are looking for.
This example shows a heading that clearly covers the content.
![]()
Headings in user guides serve several important functions:
- They provide an organisational overview of the user manual;
- They show the logical structure of product information, based on the product’s life cycle;
- They show the hierarchical relationship of topics (headings, sub-headings);
- They allow the reader to quickly navigate to the right page;
- They allow the reader to skip what they’re not interested in.
A heading marks off the boundaries between topics and subtopics of an instruction manual. A good heading covers the full content of the topic it belongs to.
It is important to craft your heading well and to use consistent styling and formatting, so your users find the information they’re looking for.
Try to work with a maximum of three levels of headings: first-, second- and third-level headings. Don't overdo the levels of headings.
Have a look at these examples:
Notice that the phrasing of headings is consistent: The first-level heading covers what the entire chapter is all about. The second-level headings use the how style of phrasing. The third-levels use noun phrases.
Make sure to craft the phrasing of headings so they are self-explanatory. The heading How to Make Pancakes is much more user-centred than Using the MagicMix2000.
Clear styling of your headings helps your reader to identify the level of a topic. Also, sometimes the style has already been determined in a company’s corporate identity guidelines.
If there is no ‘house style’, you can format the headings yourself. Although this is not the only right way to format them, I will give a style example here:
- Make first-levels all-caps;
- Make second-levels title-style caps: init-cap only the first word and any proper nouns and verbs;
- Make third-levels sentence-style caps: init-cap only the first word.
Also note that this style can not be used in all languages. In German for example, nouns should always be capitalised.
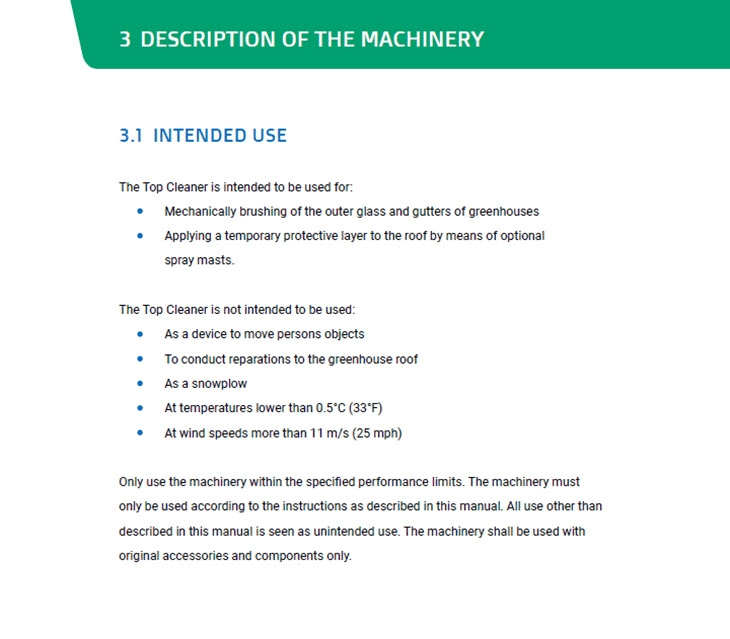
Write the ‘intended use’ and decrease your liability
A clear user manual should describe how a product shall be used according to its function and within the expected product life span.
The purpose of your product is also called the intended use of a product, machine or device.
A clear description of the intended use forms the heart of a user guide and determines (with other limitations of use, such as technical or environmental limitations) the safe envelope of using your product: it is the basis of ensuring safe, efficient and effective use of the product.
The description of the intended use frames your liability and is the starting point for the further contents of your user guide.
Once you have determined the intended use, you can focus on providing the safety and user information for using the product for its intended purpose ONLY.
Product safety laws, such as directives and standards, require most products to include a description of the intended use.
The following definition for the intended use is given by the international standard for information for use IEC/IEEE 82079-1:2019):
An exhaustive range of functions or foreseen applications defined and designed by the supplier of the product
Some examples of the intended use:
And this one:
Besides the intended use, you might want to add a description of reasonably foreseeable misuse as well
What is reasonably foreseeable misuse?
The following definition for reasonably foreseeable misuse is given by IEC/IEEE 82079-1:2019:
The use of a product or system in a way not intended by the supplier, but which can result from readily predictable human behaviour
Some examples:
- Using an aggressive detergent in a food processing environment.
- Using an automatic gateway to move persons (children standing on it when it is opening or closing)
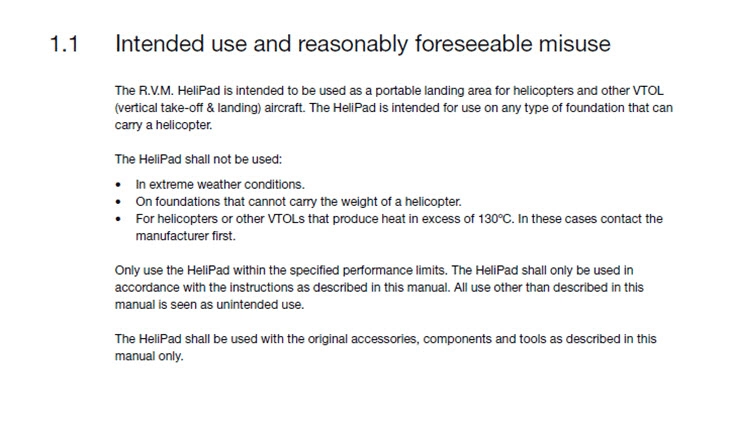
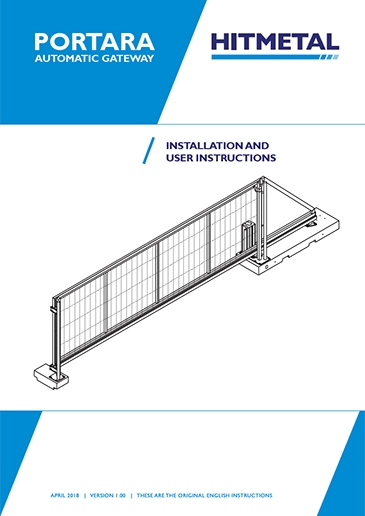
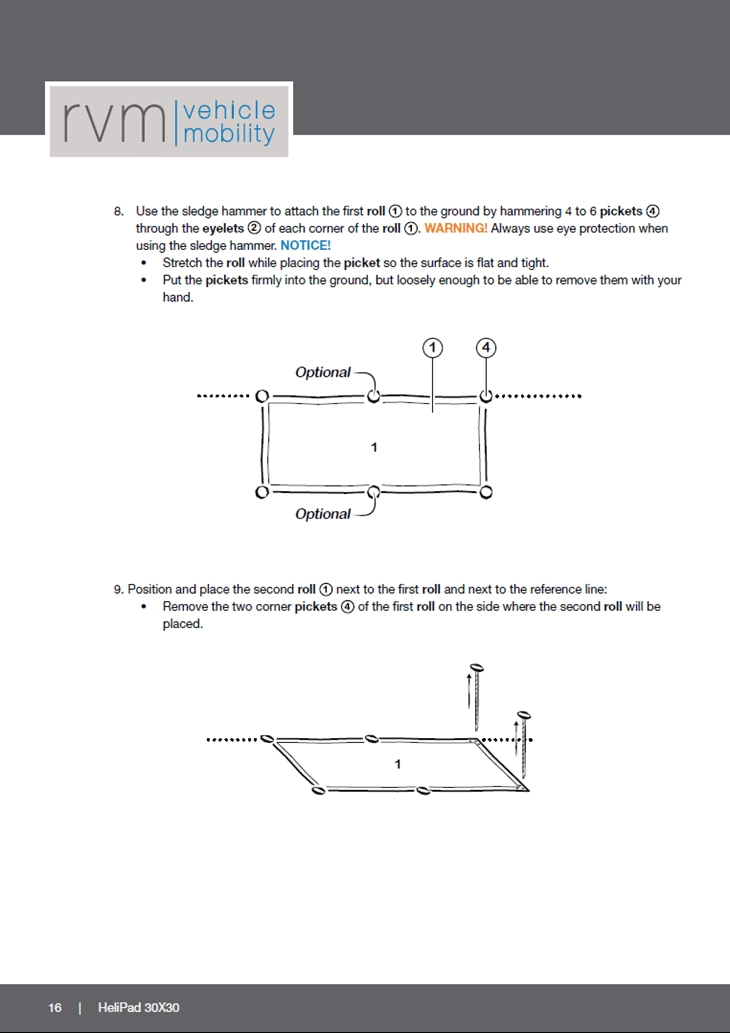
Example of the reasonably foreseeable misuse of a helicopter platform
When you pay no or too little attention to the description of the reasonably foreseeable misuse, it may affect your liability as well.
For example, when it can be reasonably foreseen that a certain cooling system used in hospitals, may be used as a system to cool organs, this should be described in the instructions.
Unforeseeable misuse should not be included in the instructions as this generally speaking does not affect your liability.
Reasonably foreseeable misuse or unforeseeable misuse?
Support clarity with clear understandable user manuals
As discussed previously, an instruction manual consists of various kinds of information that serve a specific purpose, called information types.
Examples of information types are subjects/headings, descriptions, goals, prerequisites, conditions, actions, results, warnings, prompts and reminders, examples and captions.
When you format information types consistently, your reader will consciously or subconsciously recognise them and link it to the function of the information type.
The layout of the information type makes it easy to distinguish the various elements of information. A different layout will facilitate differentiation between various information types.
See this example where the heading, instruction title, instructions, product elements and illustrations are all information types that have been formatted consistently throughout the user manual.
And this example where the level 1 & 2 headings, warning/notice, contextual information, instruction title, instructions, product elements and illustrations are all information types that have been formatted consistently.

Which information types can YOU distinguish here?
Using a style guide helps you to write and format documentation in a clearer way, and to keep a consistent tone of voice and style.
Another thing to be aware of when creating clear instruction manuals, is to avoid vague words. Examples of such words are thing, part and stuff. Using these words will make your user manual ambiguous.
If you tend to use these words, you most likely still lack information. So ask someone or find unambiguous alternatives.
Clear and to-the-point use of words will help the user to complete an action as safely and quickly and as well as possible.
An action-oriented approach should have priority in general. Your user should be provided with an immediate opportunity to act.
Using Simplified Technical English can help you to write unambiguously.
Writing instructions: Provide an immediate opportunity to act to get stuff done
You can provoke action by giving less conceptual information and focus on giving procedures: users want to get stuff done and not read about it.
There is this interesting paradox:
The best way to learn is to act. At the same time, often users need to learn first in order to act.
One of the biggest skills a technical communicator will need to develop, is the ability to find an appropriate equilibrium between supporting the reader’s instant actions on one hand and providing them with the essential conceptual information on the other hand.
Look at this example based on the principles of minimalism, that contains this balance:

Or this minimalist example
In much conventional user documentation, not much priority is given to supporting actions a user needs to perform at the beginning of the instruction manual.
Many user manuals start with explanations, technical data, safety instructions, process descriptions etc. This, for sure, can be valuable information at some point, but mostly distracts the users from getting to their goal.
Try to include only the absolute minimum of must know information in your user manual and consider all the nice to know information as obsolete.
When you succeed in being brief, the instruction manual will communicate that the user’s task does not require a significant effort but is relatively easy to execute.
The user guide stimulates a user to activate relevant prior knowledge and to depend more on their own thinking when you do not explain everything.
When you master the skill of minimising background information and provide just enough information so that the user can complete a task or understand a concept, your instructions will become much clearer.
Many user guides contain instructions that are incomplete or incorrect. When writing, it might help you to perform all of the steps yourself as you write.
This ensures that what you write is the right way to do things and it helps to focus on the must know information. It will also increase the chance that nothing is forgotten and the overall quality is improved.
Sometimes, it isn’t possible to do the steps, for example where the product concerns dangerous or complex equipment. In those cases, discuss all steps with an SME, think them through thoroughly and have everything written checked.
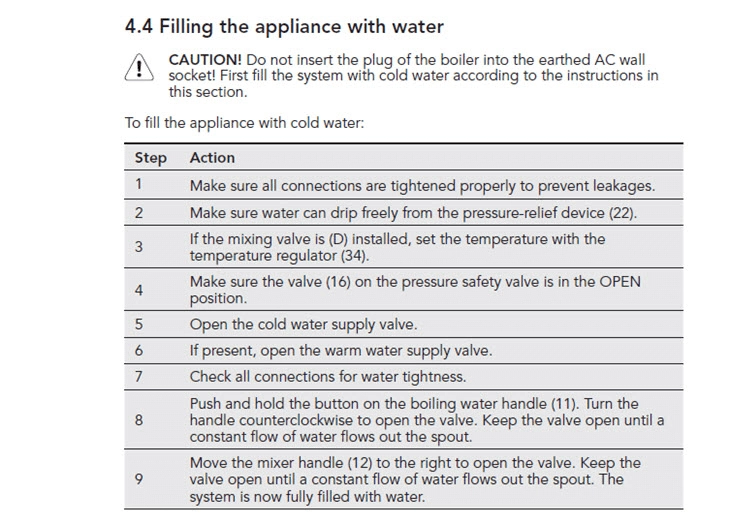
Make sure to provide step-by-step instructions that are placed in the correct order and follow the timing and sequencing of the actual operations.
Also, within one sentence, you should follow the right order. Let’s look at an example.
To select German as your default language, select Deutsch when clicking on Language in the File menu
...is way more user-unfriendly than…
To select German as your default language:
- Go to File>Language.
- Select Deutsch.
This example shows visual stepping stones: steps are numbered with 1, 2 etc. Adding these makes it clear to the users that there is a need to follow the steps one by one. Alternatively, you can even add ‘step 1’, ‘step 2’ etc.
Pretty straight forward, right?
Don’t make the instructions lengthy. Short, simple sentences with just one instruction, or at most a small number of closely related commands, per sentence work best.
Write the steps to task completion, meaning that you tell the user exactly what to do in order to complete a single task.
Avoid creating dead-ends and make sure that after going through the sequence of steps in a certain topic, the user has solved the problem: each topic has a clear beginning and ending, this is in contrast to a book that you read entirely from beginning to end.
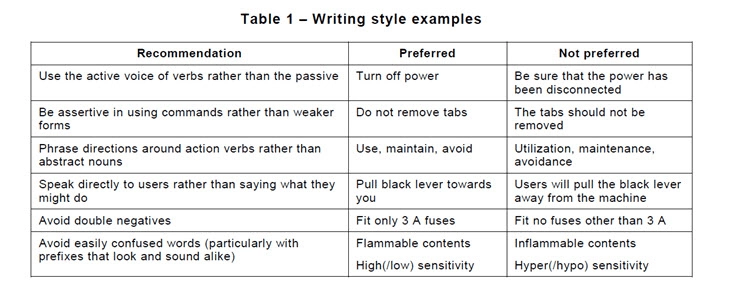
Use the active voice to write easier to understand steps
Make sure that the information you give is as simple and as brief as possible. Instructions should be written in the present tense and active voice, using strong verbs.
The active voice emphasises the user and it is easier to read and understand instructions that are written using the active voice.
The subject and verb are always clear in sentences with an active voice. For example:
“Connect a keyboard to a USB port on the remote unit.”
In this sentence, connect is the active verb and keyboard, USB port and remote unit are all subjects.
Let’s compare that sentence with this sentence in passive voice:
“A keyboard needs to be connected to a USB port on the remote unit.”
It is much clearer that the reader is the person who will complete the action in the sentence written in active voice.
By using the active voice, your instructions will be clearer, more concise, and direct.
Some more examples:
And this one:
And I recently saw this one in an office space:
Another thing to keep in mind when it comes to ‘designing’ your steps, is to not create a single step for a system or product response. For example, don’t put “The setting menu opens” as a separate step.
It is ok to incorporate product or system responses (when necessary) in the step that initiated the response.
Or you can mention the response at the beginning of the following step.
Two examples:
To select German as your default language:
- Click on the LANGUAGE button. The language window opens.
- Select Deutsch.
- Click SAVE
To select German as your default language:
- Click on the LANGUAGE button.
- In the language menu, select Deutsch.
- Click SAVE.
Minimise cross-references to prevent confusion
Every now and then you might want to add cross references to your instructions.
For example, you might want to refer to a sequence of steps that have been given somewhere else in the instruction manual. Or you simply want to refer to an entire section.
Example of a cross reference to the entire section Safety Information
In general, cross-references should be kept to a minimum. Letting your users go back and forth through the user manual is not user-friendly and confuses them.
Referring to a complete section (like in the example above), which is an addition to a certain topic but a topic on its own, generally is ok to do.
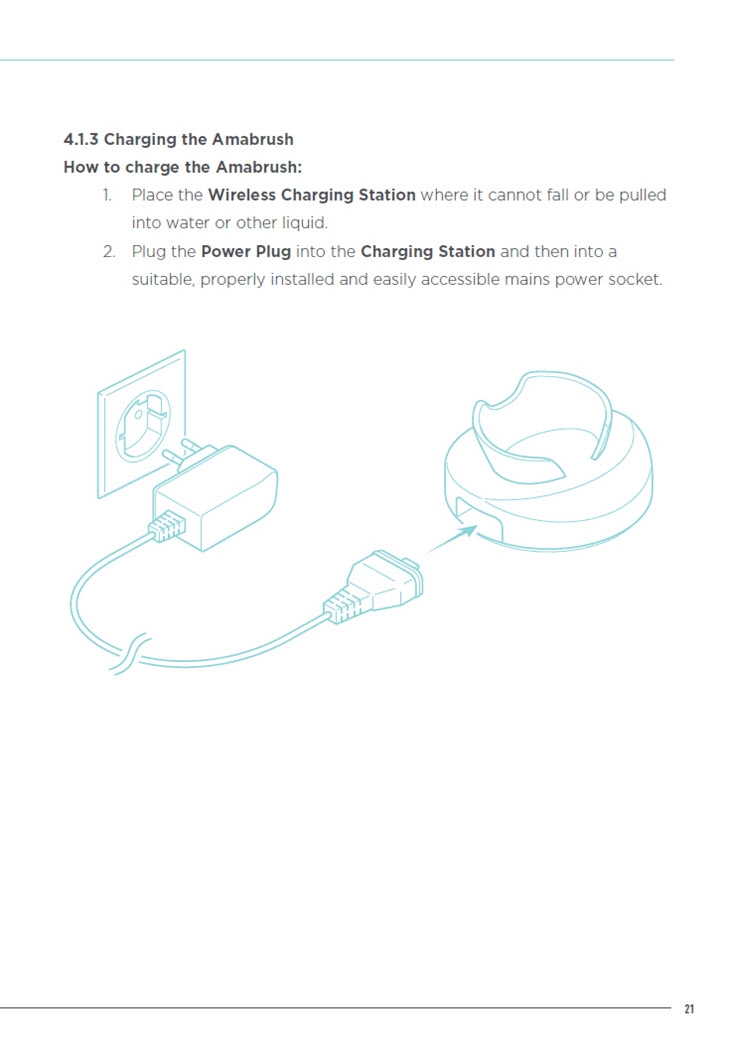
Referring to a sequence of steps, like in the example below, is not recommended.
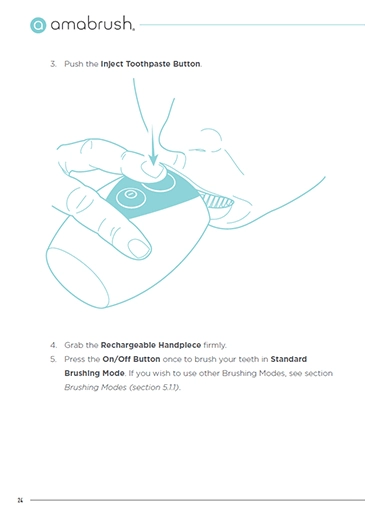
To make the battery of your eBike ready for use:
- Press the On/Off button to turn on the battery. When at least one LED, but not all LEDs of the battery indicator lights up, the battery must be charged.
- Charge the battery. See 2.1.2. How to Charge the Battery.
Force to consider details by using a style guide
I have emphasised the importance of consistency several times already, but I will mention it again here: it is crucial to express terms, product elements and units in a consistent manner.
Use consistent terminology in the instruction manual themselves, on the packaging, in other collateral materials and on the product itself (marking and labelling).
Of course, sentences should be grammatically correct, written for the target audience, and jargon should be minimised.
Avoid abbreviations and acronyms, unless it can be assumed that they are familiar to the audience you write for. If you do decide to use them, make sure to explain terms when they first appear in the style guide and/or in a glossary.
Don’t forget to avoid marketing waffle: you are writing a user manual, not promotional material. Your user already bought the product.
All of the above guidelines can be put in a style guide. A style guide provides consistency and stimulates to carefully consider all details: the presence of a style guide will force you to look closely at each single sentence.
A style guide enhances comprehensibility.
See this online example of a style guide, the IBM style guide or this SAP style guide.
Once you have established your own style guide that covers for example your writing style, wording, consistent use of terms, ways to address the readers and design of text and page layout (we will discuss this later), you will need to apply it to the entire instructions for use.
Ensure safety by using words like must, shall, should and could correctly
The correct use of words to indicate requirements and recommendations is standardised in the American ANSI Z535.5 standard.
Regardless this is a U.S standard, I also like to apply it to the instruction manuals we write for other markets.
The ANSI standard states that the correct verb form for indicating a requirement is shall. The word shall is understood to be mandatory. The universally accepted use of must instead of shall is not recognised by the standard.
For example: The product shall only be used by persons who have fully read and understood the contents of the User Manual.
The correct verb form for indicating a recommendation, as defined by the ANSI, is should. Or to speak in ANSI terminology: should is understood to be advisory.
For example: After each use, the device should be disconnected from the mains.
When there is excessive freedom of behaviour, or no guarantee that something will happen, you can use the word may. This word is understood to be permissive. Using might instead is not allowed.
For example: Some individuals may experience a mild tingling sensation when first using the device.
I have experienced a situation where U.S. customs did not allow a machine to be imported because the user guide did not use these words correctly.
Include error handling to save your user time, reduce frustration and anxiety
No matter how well a product or piece of software has been designed, things undoubtedly go wrong when using it. As a technical writer you should pay attention to this.
Users of products make many simple mistakes, and correcting these mistakes can be time consuming. According to research from the University of Twente, users spend between 25% and 50% of their time correcting errors.
So it is therefore important to add error information to instructions that users might misunderstand.
Providing error information AND providing it there where it is needed, is one of the most underestimated aspects of user documentation. There are several ways how well-designed instruction manuals can prevent users from making mistakes.
For example by providing a safe sequence of steps, using short and simple sentences, minimising jargon, using active verbs etc.
But how do you know which error information to include?
Research [1] has shown that even experienced technical writers generally do not predict really well what problems arise when their documentation is used.
The best way to find out what errors users will face is by usability testing. See Conduct user research to check what you have written.
When you have found the most common errors that occur, a model for adding problem-solving information to your user manual suggests the following stages:
- Seeing the problem;
- Expressing the problem;
- Processing the problem-solving information.
In other words: when designing error-information, make sure you support the user in detecting, diagnosing and correcting mistakes.
Let’s have a look at an old-school example:
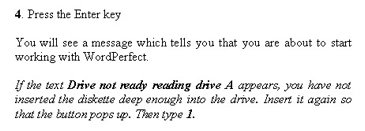
Error information as presented in a minimal instruction manual about WordPerfect.
Error information is most effective when it is given as near as possible to the source where and when the error occurs. This is often directly after a certain instruction.
When providing error information on the spot, the mistake will be detected and hopefully solved, before they can lead to other mistakes.
A separate troubleshooting section, which is quite commonly done, isn’t wrong, but it makes it more difficult for the user to access the information and understand it, as it is removed from its context.
When you provide the error information on the spot, it will save your user time, reduce frustration AND the anxiety of learning about using the product.
Additionally, good error management makes learning to use a product more productive.
I discuss this in more detail in this podcast:
Pay attention to the safety instructions and support safe use
Safety is my favourite topic. Why?
First of all, because it has to do with compliance, which is a largely overlooked topic by most tech writers. But I don’t blame them.
Information on compliance, product safety and what exactly to include in your user manual is hard to find. The websites of our legislators can be quite overwhelming.
Secondly, I like the contradiction between creating a compliant and user-friendly instruction manual at the same time.
Some technical writers like to over-warn. I have seen user guides with nothing but warnings and really not a single instruction.
Over-warning is at odds with an action-oriented approach. What would your user experience be when a 40 page instruction manual has its first actual instruction on page 32, after more than 30 pages of warnings and process descriptions?
There is a solution to this that meets in the middle!
First I would like to explain why we include warnings in user manuals.
No matter how well and safely designed a product is, using a product often comes with certain risks. Risks can be identified by conducting a risk analysis.
It is generally agreed (in international standards) that there are three ways to reduce those risks:
You can adjust the design of your product, equip the product or user with safety measures (such as safeguards, personal protective equipment) or provide safety instructions.
These three risk reducing measures should be considered in this specific order. So a user guide should never be used to warn for risks when the design can still be improved.
As a rule of thumb you should warn where the risk is most likely to occur.
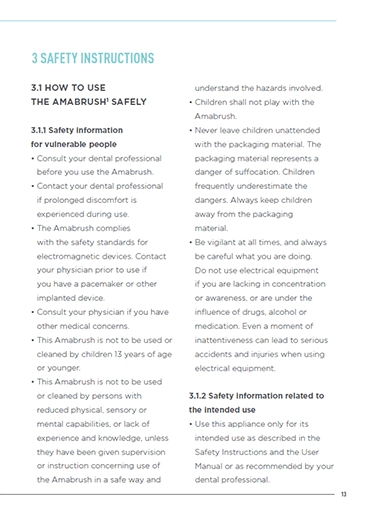
For the user manual this means that there can be distinguished four types of safety instructions: supplemental directives, grouped safety messages, section safety messages and embedded safety messages (see this post for more information about these).
As the name suggests, section safety messages are placed at the beginning of a specific section.

When it comes to usability, you can do two things here.
First of all, you could sum up all safety warnings that relate to that specific section.
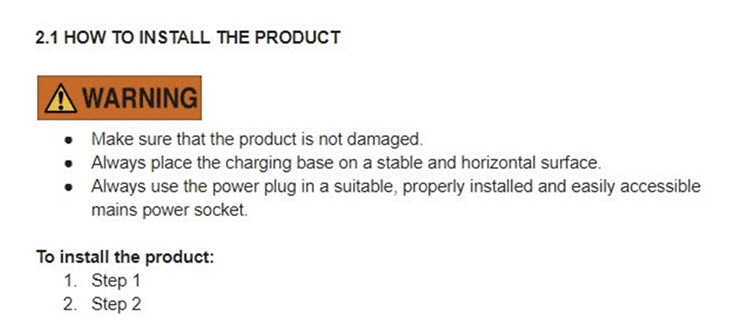
Considering the number of warnings, the use of this electric toothbrush seems just as dangerous as working on a nuclear power plant.
A more user-friendly approach would be:
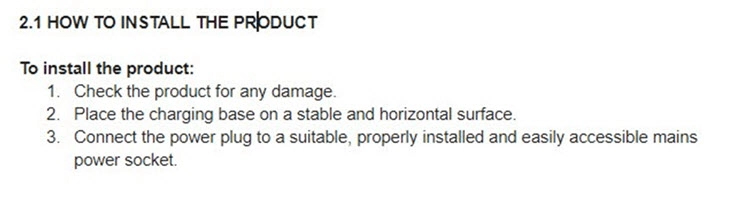
I am not saying not to use any warnings at all, but it definitely is possible to reduce the number of warnings drastically in many cases.
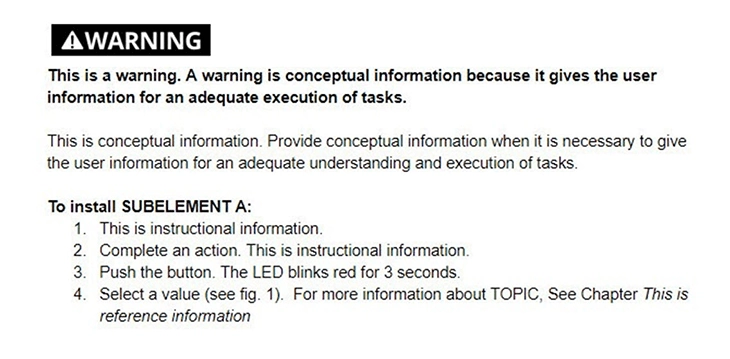
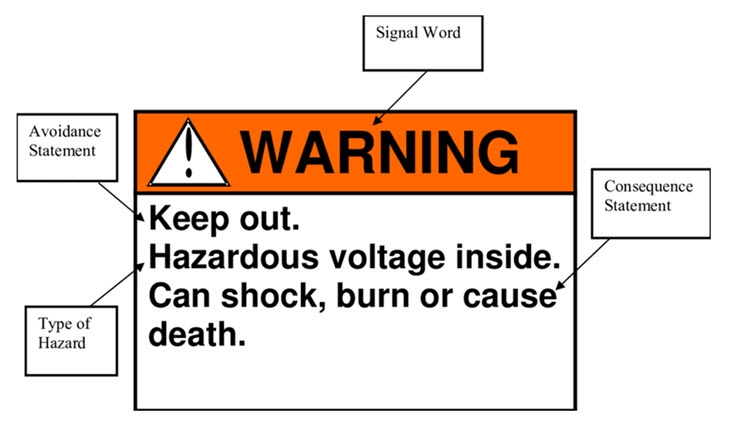
When you do decide to provide a warning instead of an instruction, make sure to structure the warning well.
A good warning consists of three parts:
- The type and source of hazard;
- The consequences in the event of non-compliance;
- Measures to avoid the hazard.
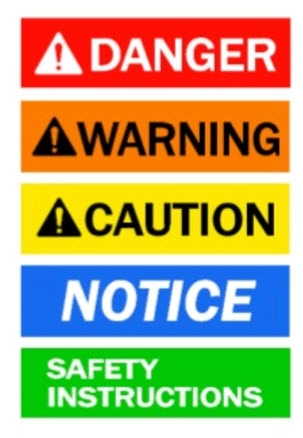
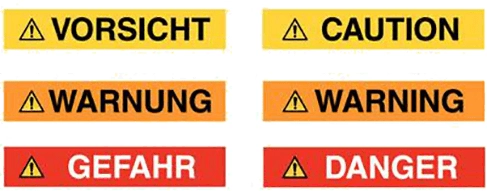
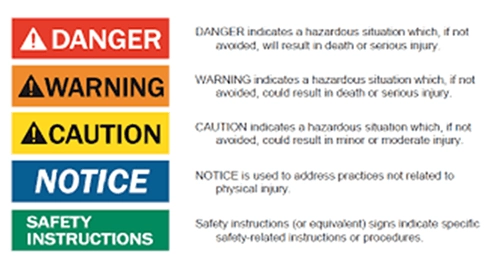
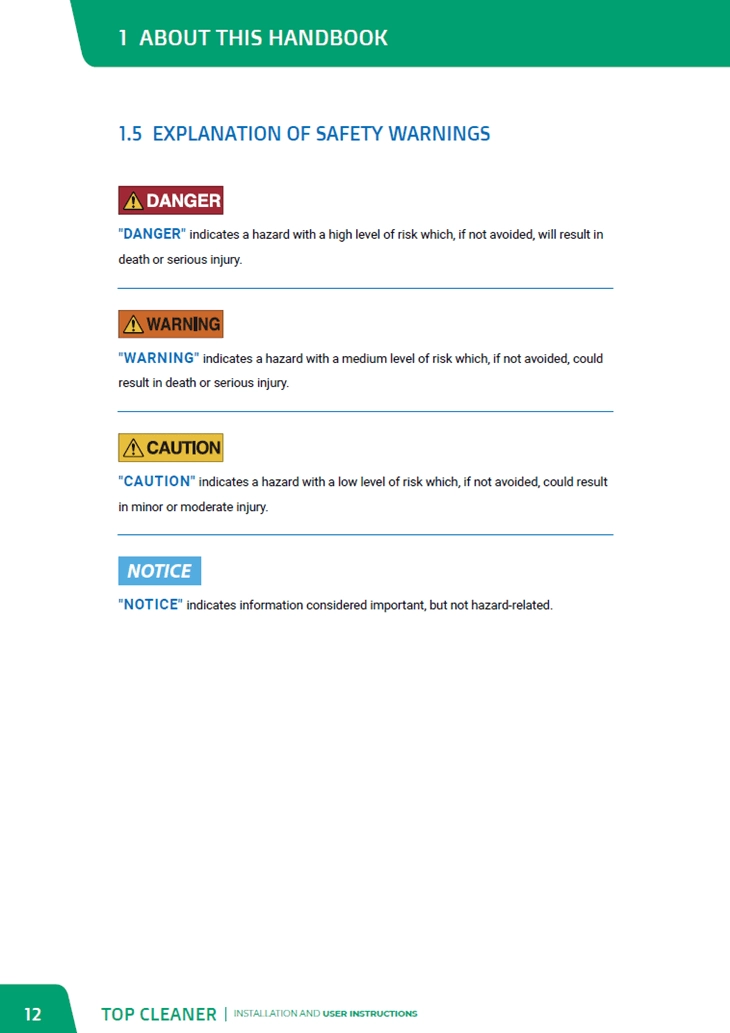
A warning is preceded by the signal word danger, warning, caution or notice.
Nowadays, the meanings of signal words are similar in several available standards describing risk levels.
|
ISO 3864-2 |
ANSI Z535.6 |
|
|
DANGER |
Signal word used to indicate an imminently hazardous situation which, if not avoided, will result in death or serious injury |
Indicates a hazardous situation that, if not avoided, will result in death or serious injury. |
|
WARNING |
Signal word used to indicate a potentially hazardous situation which, if not avoided, could result in death or serious injury |
Indicates a hazardous situation that, if not avoided, could result in death or serious injury. |
|
CAUTION |
Signal word used to indicate a potentially hazardous situation which, if not avoided, could result in minor or moderate injury |
Indicates a hazardous situation that, if not avoided, could result in minor or moderate injury. |
|
NOTICE |
- |
Indicates information considered important, but not hazard-related |
And this is how a hazard safety panel should look like according to ISO 3864 (left) and ANSI (right):
| ISO 3864-2 | ANSI Z535 |
.webp) |
 |
As ANSI has included the ISO safety panels as well, you are safe to use them for several markets.
Avoid legal pitfalls and make your instruction manual legally compliant
Depending on the product you are writing for, chances are there are legal requirements on the content, presentation and format of your user guides.
These can come from federal laws in the US, directives or regulations in the EU or similar legislation in other countries or states.
Standards can be used, if not made mandatory, in order to comply with the (CE) requirements.
For example, medical devices are the most heavily regulated products. In the US, there is the Guidance on Medical Device Patient Labelling, whereas in the EU requirements on the instructions for use are given in the Medical Device Regulation.
By complying with the legal requirements and applying standards, you create a user guide that is legally compliant.
This will help you to avoid any legal pitfalls, will let your product pass tests and customs, decrease your liability, provide competitive advantage and make sure your users can use the product more safely.
Generally speaking, the following process should be followed to create compliant user manuals:
- Identify legislation (laws/directives);
- Identify standards;
- Identify requirements of the legislation and standards that apply to your product;
- Add legal content to the instruction manual.
I have written about this process in more detail for both the American market and the European market.
Also, these templates might help you create compliant user manual for machinery (EU, UK, US), electrical equipment (EU, UK, US) or medical devices (EU, UK, US).
This article describes the ISO 20607 standard on creating Instruction Handbooks for machinery.
These videos explain exactly how to create a compliant manual for an electrical piece of equipment.
How to use the Operator Manual Template to create a machinery manual:
And for medical devices:
Add navigation to optimise your user guide for findability
An essential part of a clear and effective user manual is the way your user can navigate to the information they are looking for.
Much of this has been discussed already in the previous chapter. But there is more than adding a table of contents, page numbering, clear headings and a logical structure.
Instead of ordering your topics according to the life cycle of a product (from unpacking to disposal), you might want to divide your section ordered by chronology of use, expertise level (beginner or expert), functional category or frequency of use.
The order of the topics largely determines how quick users find what they are looking for.
You can code your hierarchy with tabs or colours or emphasise the importance of certain information types with contrast, colour, shading and embolding, which is actually part of how you present your instruction manual (see Chapter 4).
Another way of guiding your user to the right information is by including an index or glossary
An index is an alphabetical list of names, key words, product elements, life cycle stages etc. with reference to the pages on which they are mentioned.
Make sure that the index includes synonyms that are most likely used.

Example of an index
A glossary is an alphabetical list of words relating to the specific subject you are writing about, with explanations. So it is actually a brief dictionary.
Example of a glossary
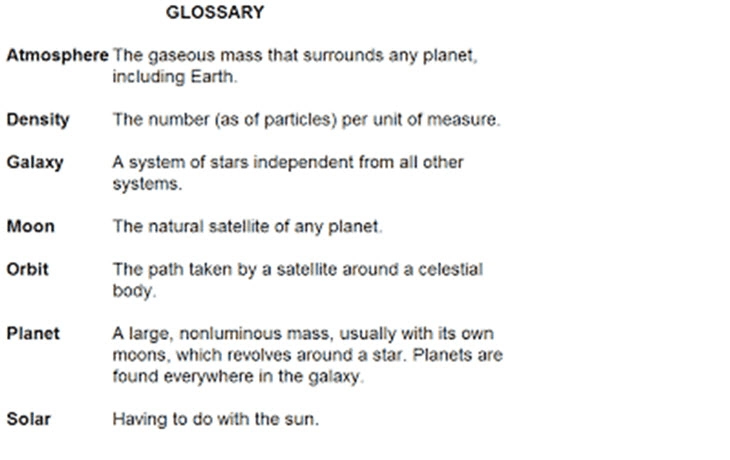
Another glossary example
Review your user manual to get rid of errors, pt. 1
Once you have used all these tips and examples to write the content of your manual, it is time for reviewing your work.
You have now created the draft version of your instruction manual. Internally, we name this version the textual content design (we could put this one in the glossary, lol).
Ask all persons with in-depth technical product knowledge that contributed to delivering information, to review the work so far.
I prefer to work with a technical authoring tool for the review process or simply via Google Doc.
Use their feedback to optimise the instruction manual.
CHAPTER 3 - How to Create a User Manual with Clear Visuals
With visuals in user manuals I mean much more than screenshots or illustrations.
Visuals include all kinds of graphical representations, such as line drawings, photos, screenshots, video, symbols, tables, charts, graphics and infographics.
All of these serve a different purpose.
Use illustrations to enhance text
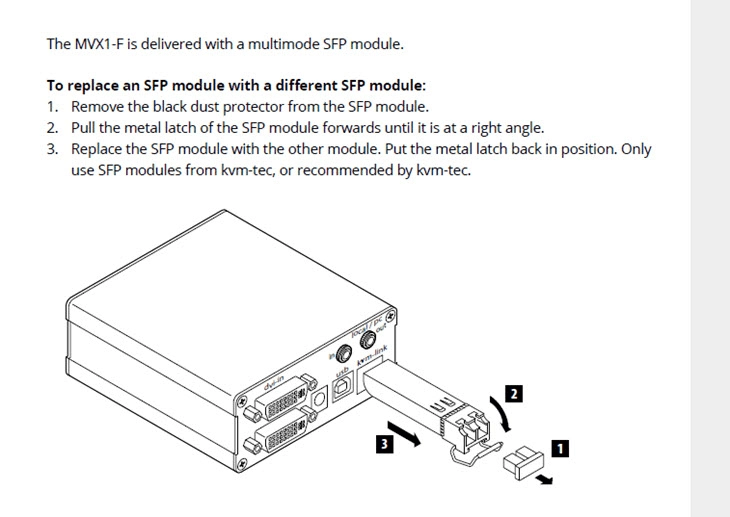
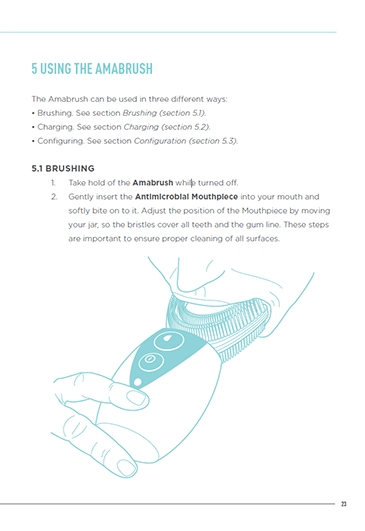
You can use line illustrations to support, replace or augment text and to present a chronological sequence of a process or steps to be followed.
Make sure that the sequence of illustrations that you place in your user guide is logical and comprehensible.
Illustrations to describe a sequence of steps
When you place illustrations as close as possible to the text to which they relate, it is clear to which textual instruction they belong. Ensure that related text and illustrations are viewable at the same time and that they support each other in order to enhance comprehensibility.
Compared to photos, you have much more freedom with illustrations to focus on important details. You can easily leave out less relevant information or enlarge certain parts.
An advantage of fully replacing text by illustrations, is that illustrations don’t need to be translated. Keep in mind that creating comprehensible illustrations requires skills.
Although there are many tools available that can support you, having them created by a competent graphic artist or technical illustrator might be a wise decision.
When creating illustrations, keep printing quality or screen resolution in mind. Illustrations used on screens require a resolution of 72 dpi and, for print, resolutions of minimum 300 dpi are preferable.
Add numbered captions to your illustrations so it is clear to the user what the illustration is about and so the illustration is easy to identify when referred to in the text.
Illustrations can also be used to identify product parts and main functions, represent a schematic version of your product or for example the electric scheme.
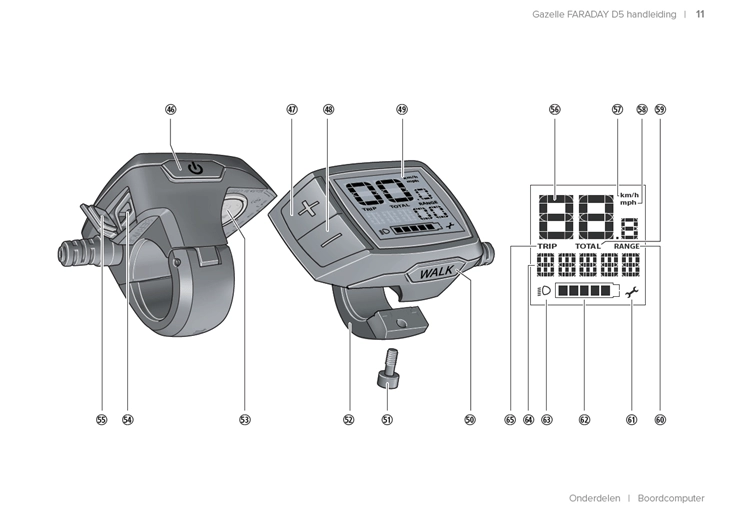
Illustration that identifies main product parts
Sometimes photos are used instead of illustrations. However, I really prefer the use of line illustrations as these are often much clearer.

Use of a photo in a user manual that our client created
Use of an illustration in the new instruction manual the we created
When creating illustrations, you can leave out irrelevant information or easily emphasise important information. With photos this will be more complicated.
Screenshots can be used to visually represent the user interface of a control panel, software on a desktop computer or an app.
Screenshots can give an overview of functionalities or be used to show what needs to be done or to present the result of a certain action.
Screenshot with an overview of main functionalities
Explanation of the use of an app in a user guide
Use tables to organise data
You can use tables to organise numeric or verbal data. For example, technical data are more legible when presented in a table. In many cases, a table can fully replace text.
Make sure to set out tables clearly, informatively, and in a consistent design. Position tables next to the relevant text. As an exception, reference tables (such as a spare part list) can be placed in annexes.
Technical data presented in a table
Consider using video instead of illustrations
Video or animation can serve many purposes.
The use of video could be your choice when you clearly want to demonstrate something, show movement, a state or force. Also, as video is increasingly popular, you might want to use it when reaching as many people as possible is your goal.
Video can be realistic (filmed with a camera), a 3D animation or an illustrated animation, as long as you keep in mind that videos should be short and relevant.
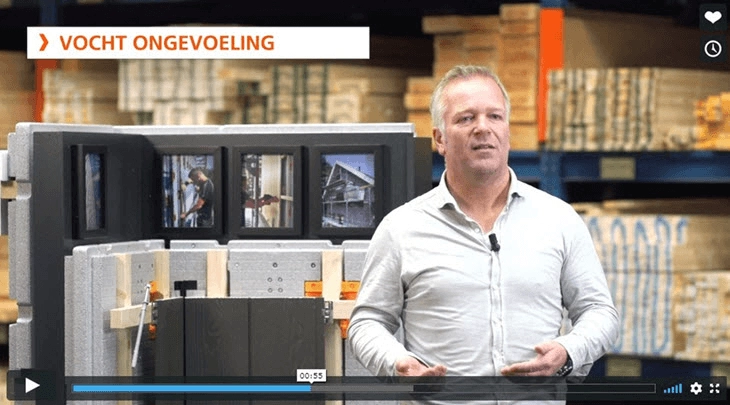
Example of a realistic video tutorial
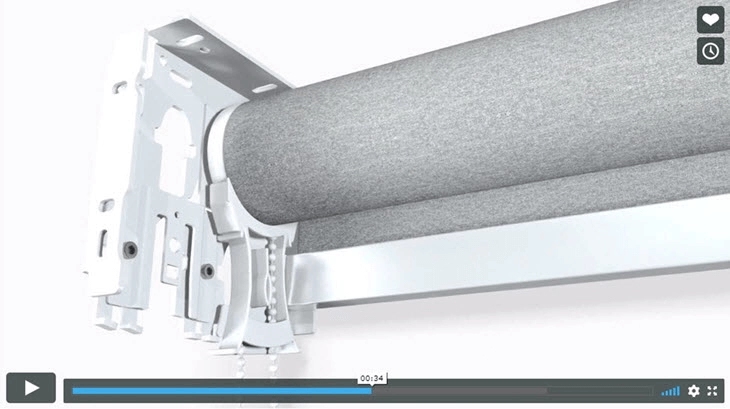
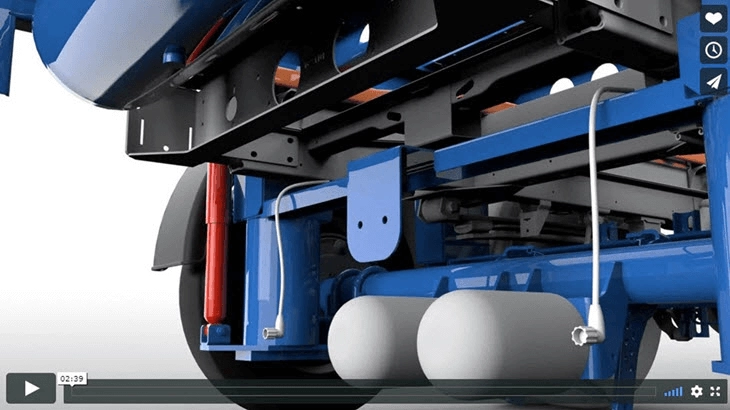
Example of a 3D animation
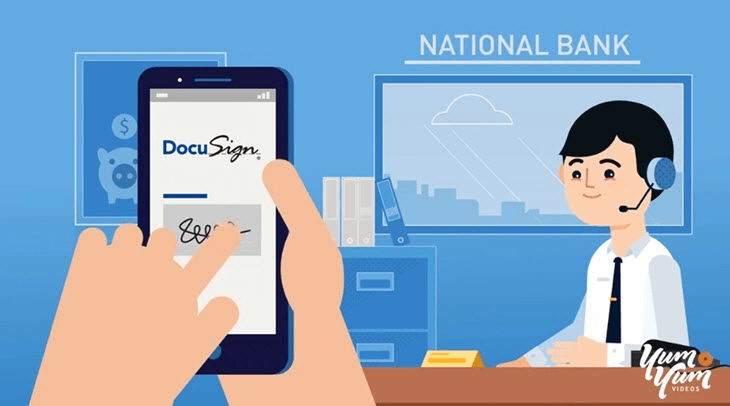
Example of an explainer video in cartoon style
When using video, synchronised spoken or written text, or both, can be used to accompany the sequences.
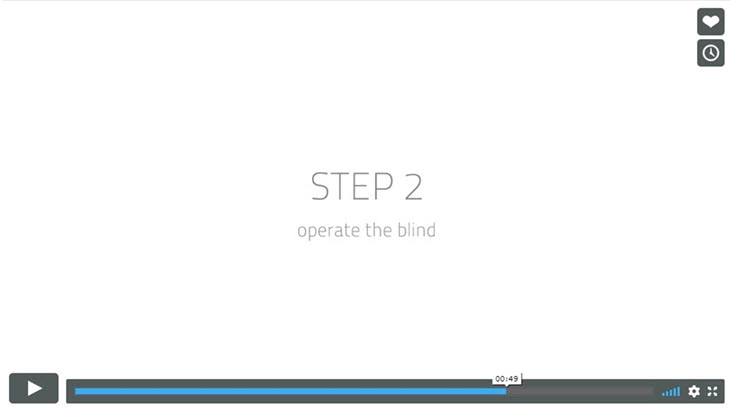
Use interactive animations to increase effectiveness and efficiency
Another increasingly important form of animation, is interactive animation. Interactive animation can be best described as a sequence of visual and auditory elements. It can best be used to explain complex processes, such as a sequence of installation instructions.
When done correctly (according to minimalism principles), video and interactive animation often is more effective than any other form of instructions.
According to research, viewers remember information for a longer period (making it more effective) and viewers learn quicker (making it more efficient).
Example of an online interactive animation according to minimalism principles
Keep in mind that, as video might require a stable internet connection, it is less suitable in areas with bad reception.
Be aware that for some products or in certain countries a paper instruction manual might be required, so don’t think that video can always replace your paper user guide.
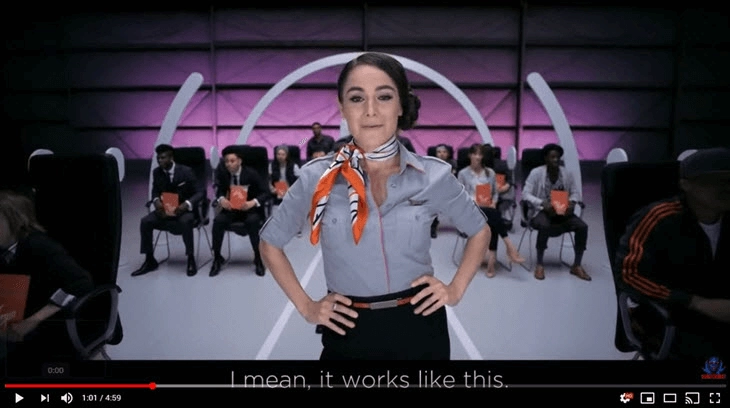
Have a look at this incredibly funny video of Virgin America in which they present their safety instructions.
You can use infographics, graphics, charts and diagrams to show patterns, organise and visually present data, show relationships, create overviews etc.
Use symbols if you want to communicate language-independently
Symbols, icons and safety signs are often used in instruction manuals. They are characterised by having a predefined and clearly identifiable meaning and are used to transmit information
independently of language.
This meaning is created by a combination of colour and geometric shape.
Many symbols, icons and signs have been standardised. Some often used standards are:
- ISO 7010 - Graphical symbols – Safety colours and safety signs – Registered safety signs
- ISO 3864 - Graphical symbols – Safety colours and safety signs
- ANSI Z535.6 - Product Safety Information In Product Manuals, Instructions And Other Collateral Materials
- IEC 60617 - Graphical symbols for diagrams
- ISO 14617 - Graphical symbols for diagrams
- ISO 5807 - Information processing – Documentation symbols and conventions for data, program and system flowcharts, program network charts and system resources charts
Flow chart symbols according to ISO 5807
Safety Panels according to ISO 3864
Safety Panels according to ANSI Z535.6
If a graphical concept is represented by a graphical symbol registered in a standard, it is highly recommended to use this symbol.
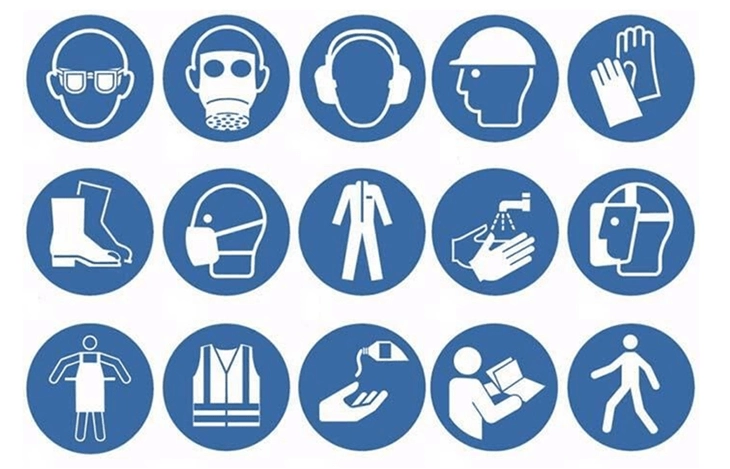
Examples of clear icons according to ISO 7010
Icons can be used to represent objects or functions. Make sure you use them uniquely and consistently for just one purpose. Never use different icons for the same object or function.
For more directions on when to use text or visuals, see this post.
CHAPTER 4 - How to Present Your Instruction Manual
Luckily, more and more companies see the importance of both an attractive design and the use of several media to bring the information to the reader.
User experience is HOT!
Just providing the manufacturer’s manuals in Chinglish, or a simple MS Word user manual written and formatted by one of the engineers, will soon be a thing of the past.
There are many ways to communicate the use of a product with its user. You can determine the media of the information based on the needs of the target audiences.
Make sure that the media provide easy access to the information throughout the intended lifetime of the product. Therefore, always keep in mind the lifetime of the product and even consider mentioning it in the instruction manual.
Some examples of possible media for user instructions are text, visuals (photographs, safety signs, graphical symbols and illustrations), video (including auxiliary means such as audio and subtitles), animations, speech, braille, augmented reality, virtual reality, leaflets or stapled booklets with text, illustrations and printed information on the packaging or on the product itself.
Although regulations slowly become less strict, always inform yourself about any legal requirements on the publication form in the country where you are selling your product. See this article about online publication as well.
Available technical authoring tools can help you to create both online and print user instructions, using the same single sourced content.
CONTACT US FOR MORE INFORMATION
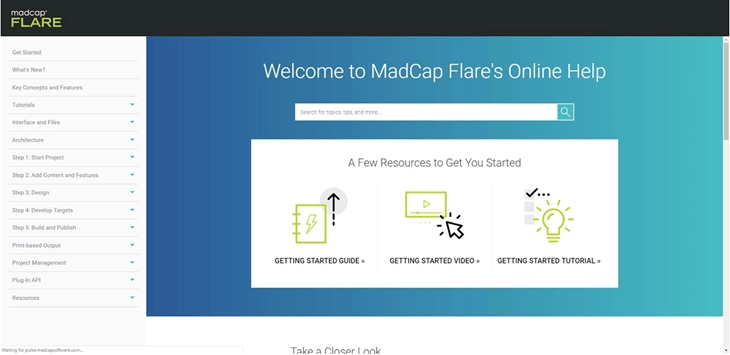
Single sourcing with MadCap Flare
Regardless of the chosen medium, it is also important to format the information for both the media and the target audience.
As you can imagine, someone who is visually impaired might benefit from a larger font size.
Let’s go through some other design principles.
Make purposeful and effective use of colour.
Provide lots of white space.
Use a clean, readable sans-serif font. Ensure that the font size fits the needs of the audience. Avoid using multiple font styles.
Use bold, italic or courier typeface for terminology, reference information or input.
Bold font used to indicate the product elements.
Italics used to indicate other sections.
Font weight can be used sparingly to denote importance.
Ensure high text-to-background contrast. Black text on a white background works best.
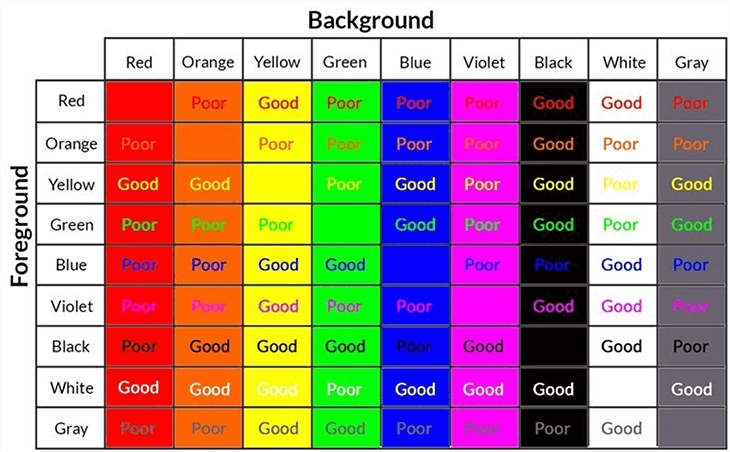
Use colour coding consistently and apply standards, if applicable.
Use consistent layout from page to page.
For information that is made available on the Internet, you can use ISO/IEC 40500:2012 for content accessibility guidelines for both presentation and navigation.
Information that is printed onto. or moulded into, the product, must remain legible throughout the lifetime of the product.
When information is only given on the packaging or in materials accompanying the product, make sure it is in a durable form. It should survive frequent use during the lifetime of the product and in an environment where the product is intended to be used.
Part of how you present your user guides has to do with the language. It is generally agreed, and in most cases mandatory, to provide the instructions in the language of the country where the product is being sold.
For easy of distribution, these instructions are provided in 24 languages
CHAPTER 5 - How to Finalise and Distribute Your User Manual
I have now developed the content in chapter 2 (texts) and 3 (visuals) and the form in chapter 4, so it is time to finalise the user guide.
The first thing you want to do is to proofread your instruction manual. Proofreading is the process of examining your written user instructions for errors.
You can outsource this, which is what I would suggest you do, or you can do it yourself.
It can be difficult to proofread your own work and see the errors you made. If you're reading through your own work, your mind will read it like how it should have been written.
This is called cognitive blindness.
Most professional translation agencies offer proofreading services.
![]()
Your user manual might need to be translated into the language of your target audience.
Once the proofreading has been done, you have a good starting point for the translations. Also, it is generally agreed that an English instruction manual is the best starting point for translations.
Why?
First of all, in the English language it is easier to create clear instructional sentences, such as ‘Push the On/Off button’. In German for example, this would be ‘Drücken Sie den Ein/Aus Schalter’.
When the latter would be the original language, it could easily be translated into ‘You can now push the On/Off button’, as the translator sees the word ‘Sie’ and wants to use it in a sentence, as he/she might not be fully aware of the importance of starting sentences with active verbs.
Secondly, as English is the most spoken second language in the world, translating from English into another language is cheaper. It is easier to find someone to translate from English into Dutch, than from Dutch into English.
When finding someone to translate your instruction manual, try to look for a translator with similar translation experience.
This might be a translator who is experienced in translating technical content, translating similar products, or in translating user guides.
When translating into multiple languages, working with a translation agency might save you lots of time, as they can take over the often complex project management.
You might consider asking the translator or agency about their quality procedures and who is going to revise the text after translation.
Often used standards are ISO 17100 for translation services and ISO 9001 for quality management systems.
Also, the IEC/IEEE 82079-1:2019 gives competency requirements for the translators of technical documentation.
According to the standard, translators should have basic competencies as stated in proficiency level 1, should be as fluent in the original language as in the target language, should be native speakers in the target language and should be familiar with the type of product and any product-specific terminology.
As you know who your audience is and how your product works, you can increase the quality of your translations by providing the translator or agency a glossary or a list with the terminology that you want to use.
Look for a translator who can work directly in your MS Word, Google Doc or InDesign file, or find an agency that can do the DTP works as well.
The tool that you use to create your final instruction manual largely determines how the output, DTP and translation process is organised.
Tools like Word and InDesign are the most used user manual alternatives.
When you need to create several user manuals for similar products and/or in several languages, using a CCMS could be of great advantage. Most of these tools are based on industry standards, suchs as XML, CSS and XLIFF.
Some available tools are Paligo, MadCap Flare, Author-it, Framemaker, Oxygen XML and SCHEMA ST4.
These tools have reuse of content as a starting point. By clearly separating content from form, the output process is automated, whereas with InDesign you will need several DTP hours.
Also, most CMS or CCMS tools intended for technical authoring, allow you to create both online and print output using the same content.
When printing your user guide, don’t forget to use paper that is commensurate with the quality of the product.

Examples of print user manual
Examples of an online software user manual
Once you have finished and published your instructions, or maybe one step earlier, a usability test helps you to check if your users understand what you have assumed and written.
Make sure to use naive and actual users that represent your audience and do not use designers or product experts.
Watch the participants of the user research closely when they are using the user manual to get something done.
Examine where they zip through it. Note where they get confused, completely lost or fail when performing a task. You can also record and analyse the research.
Listen closely to what the users have to say and use all this information to then adjust your instruction manual accordingly. Don’t forget to provide your findings in the form of error handling information (see Include error handling to save your user time, reduce frustration and anxiety).

To create a great first impression, you might have decided to make purposeful and effective use of colour or contrast. Colour-coding also helps to aid navigation,
When using colour or contrast, make sure you consider the needs of disabled users, such as users with low vision or who are colour-blind.
Test your use of colours during the usability research, to ensure they can be read by colour-blind users.
Consider providing alternative instruction manuals in Braille, large print, audio etc. for these users.
Conclusion
Well, there is a lot to say about how to write a user manual. And I have only covered the most important topics!
When you really want to create awesome instructions, you will need to practice a lot.
Or as Macolm Gladwell describes in his bestselling book “Outliers,” it takes 10,000 hours to master a skill.
I hope that with this summary, I have given some useful input based on my ideas of writing good user guides.
By following the tips from this article and looking at the provided examples, I hope you have a better understanding of creating better information for use.
So, absorb the information and create awesome instructions!
So, what's next? This case study (including a free user manual template) contains tons of additional information.
If you find that this post is helpful to you, I would appreciate it if you could leave a comment below.
Download our free user manual template here:
![]()
 |
Ferry Vermeulen is a technical communication expert and director at INSTRKTIV. It's Ferry’s mission to create digital user instructions for all products in the world. Listen to the INSTRKTIV podcast on Spotify or read one of his latest blog articles. Linkedin I Spotify I YouTube I Facebook I Twitter |
DO YOU WANT A USER MANUAL TEMPLATE THAT ALREADY CONTAINS THE LEGAL PARTS?
Take the shortest way to a compliant manual. We have developed user manual templates for machinery, toys, medical devices and electronics that contain all legal content.